A large database packed with up-to-date cyber threat intelligence, including reports, news, and more that can be queried with an LLM? Sounds expensive, but it can be built using open-source components at no cost.
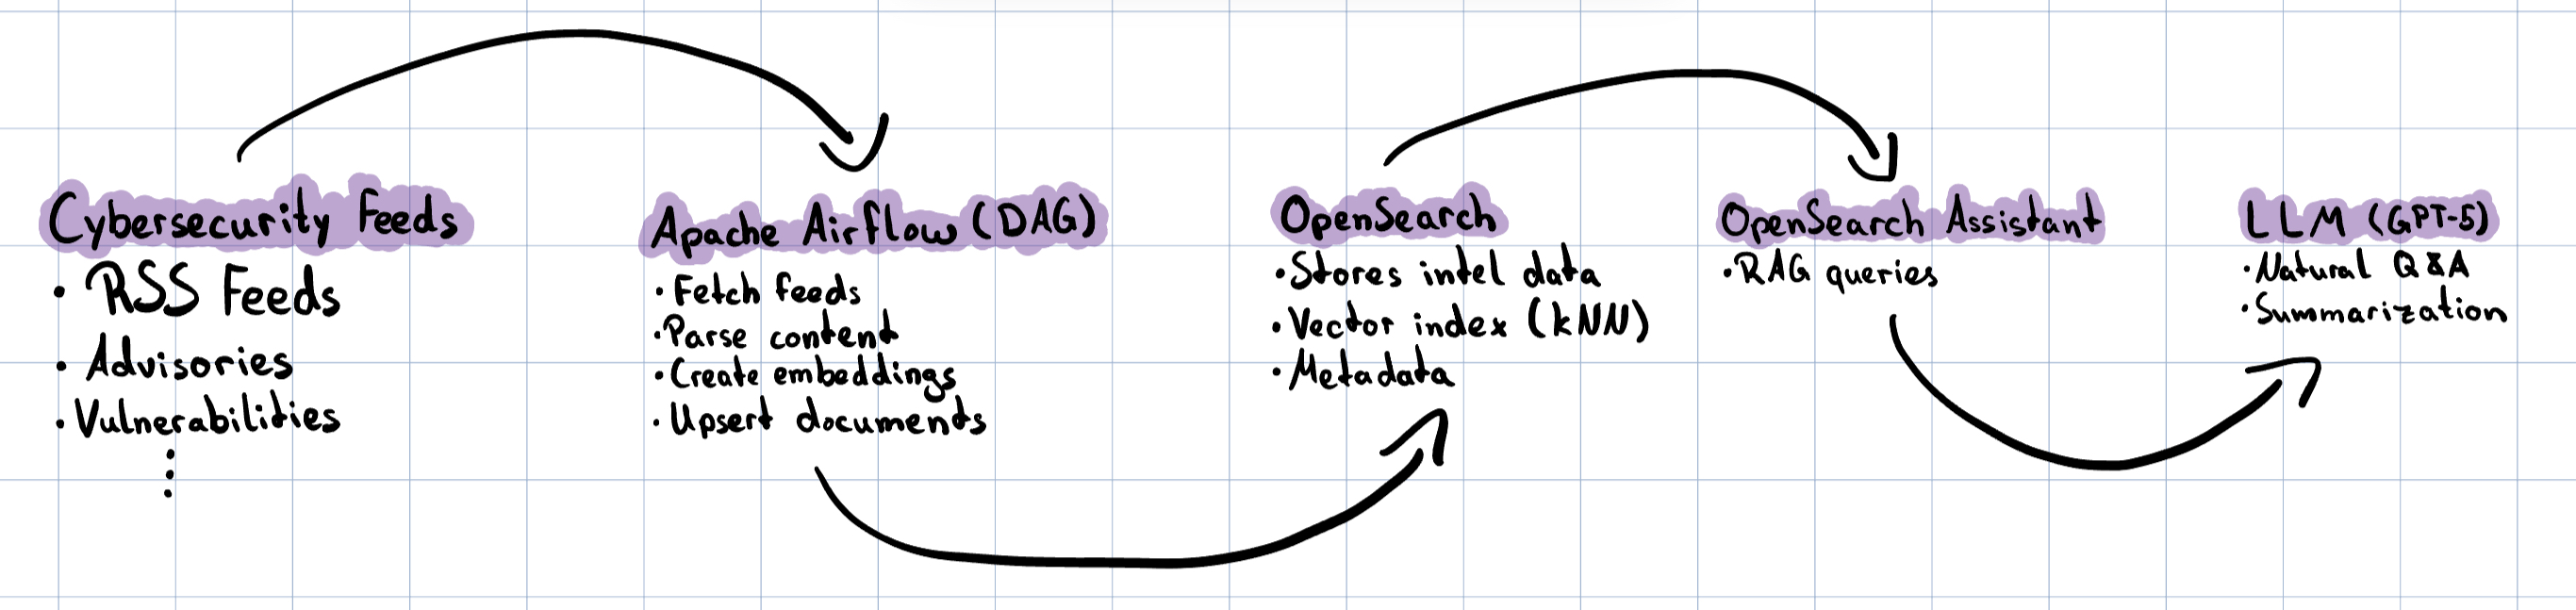
The goal of this mini-project is to set up a data pipeline that automatically pulls cybersecurity RSS feeds, stores the articles in an OpenSearch database, and generates vector embeddings so the content can be queried with an LLM.
This post shows the ingestion of RSS feeds, but theres more data that can be ingested into the database:
| Threat Advisories | Vulnerability Data | Security Knowledge Bases | Other |
|---|---|---|---|
| CISA | NIST NVD | MITRE ATT&CK & D3FEND | Google Project Zero |
| CERT-EU | cve.org | APEC (attack patterns) and CWE (weaknesses) | ENISA Threat Landscape & sector reports |
| UK NCSC | OSV.dev | NIST CSF 2.0 Reference Tool | |
| NSA Cybersecurity advisories/guidance | GitHub Advisory Database | ||
| Red Hat Security Data API (CSAF/CVE/OVAL) | |||
| Cisco PSIRT openVuln API | |||
| Microsoft Security Update Guide (CVRF/APIs) |
Prerequisites
For my demo setup, I’m using a Debian 12 VM running on Proxmox. The instructions should also work on other Linux distributions or even locally on your machine with some minor adjustments.
- Debian 12 Server
- Python 3.11 with the following packages installed: python3.11-venv python3.11-distutils python-pip
- Docker and Docker Compose
Install OpenSearch
I’ll begin by installing a single-node OpenSearch stack with Docker Compose. In a production environment you might want to use a multi node setup that is installed bare metal or on Kubernetes, but for my homelab a single node Docker stack should do the job just fine.
Preparing the server
Before I can spin up the Docker containers the server needs some a small adjustment.
Disable memory paging and swapping and increase the max map count:
sudo swapoff -a
echo "vm.max_map_count=262144" | sudo tee /etc/sysctl.d/99-max_map_count.conf
sudo sysctl --system
sysctl vm.max_map_count
swapoff -a will disable all swaps temporarily.
If you have some swaps in /etc/fstab, just comment them out and reboot.
Install OpenSearch and OpenSearch Dashboards using Docker Compose
Now OpenSearch can be installed using Docker Compose.
- Create a new directory and download the sample Compose file:
sudo mkdir /opt/docker && cd /opt/docker && mkdir opensearch && cd opensearch
Download the Compose file:
wget https://raw.githubusercontent.com/opensearch-project/documentation-website/3.2/assets/examples/docker-compose.ymlCreate a .env file for storing credentials and variables:
sudo nano .env
OPENSEARCH_INITIAL_ADMIN_PASSWORD=<custom-admin-password>
- Start the Compose stack:
docker compose up -d
- Now the OpenSearch Dashboards UI can be opened in the Browser using the following URL:
https://<docker-host>:5601/
Login to Dashboards
The default username is admin and the password is the one defined in the .env file.

After logging in we can see an empty landing page: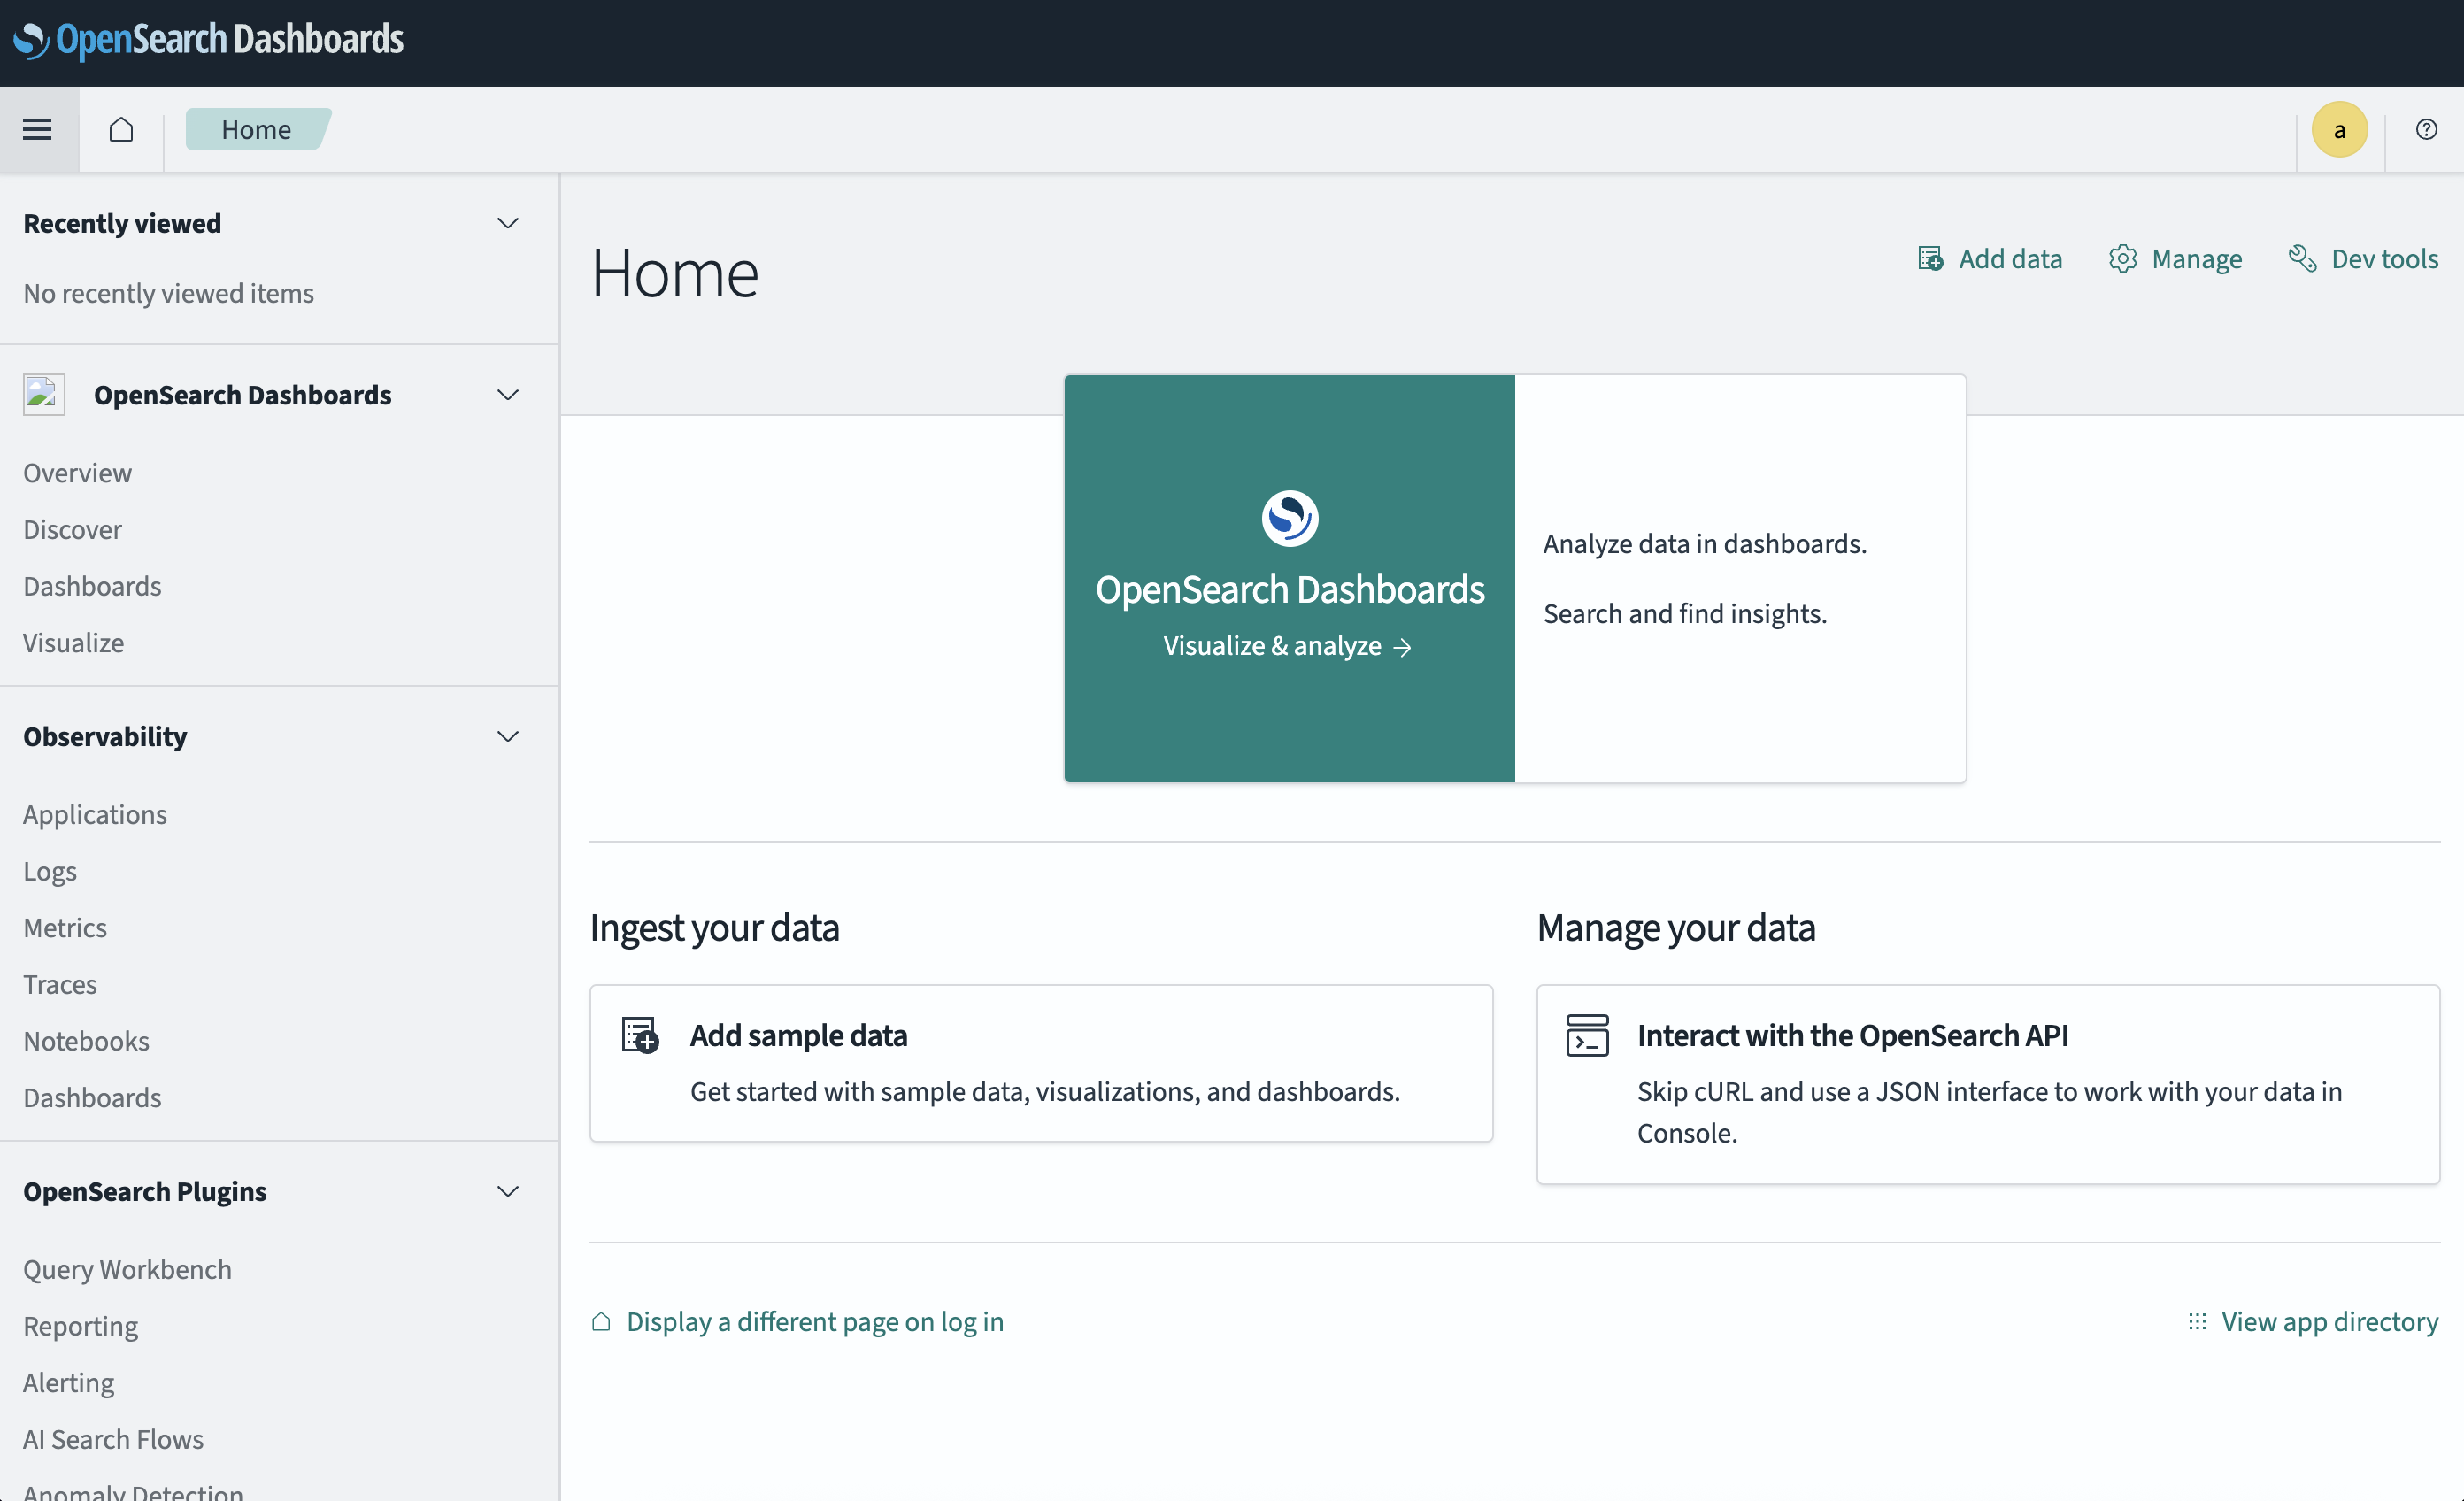
Create a new index in OpenSearch
Now I’ll create an index dedicated to my news feeds. This keeps them organized and separate from any other future datasets.
I’ll call the index news-articles and define:
- Fields
- title, summary, content as text: full-text search with BM25, good for keyword queries and highlighting.
- link as keyword: exact matching and de-duplication, no analysis needed.
- source as keyword: clean filtering and aggregations by feed or publisher.
- published_at as date: proper sorting and range queries over time.
- an idempotent external id (doc_id) = stable hash of the article URL
- a 384-dimensional k-NN vector (embedding) compatible with all-MiniLM-L6-v2
- Matches the output size of all-MiniLM-L6-v2, which gives solid relevance at low cost. 384 floats keep memory use modest while remaining accurate enough for news Q&A.
- Index settings for a single-node dev box
- number_of_shards: 1: avoids overhead from unnecessary shard splitting on small data.
- number_of_replicas: 0: no replica on a single node, saves disk and RAM.
- refresh_interval: 30s during ingestion: better throughput by reducing segment churn. You can switch back to 1s after the initial load.
- index.knn: true: enables the k-NN plugin so vector search works out of the box.
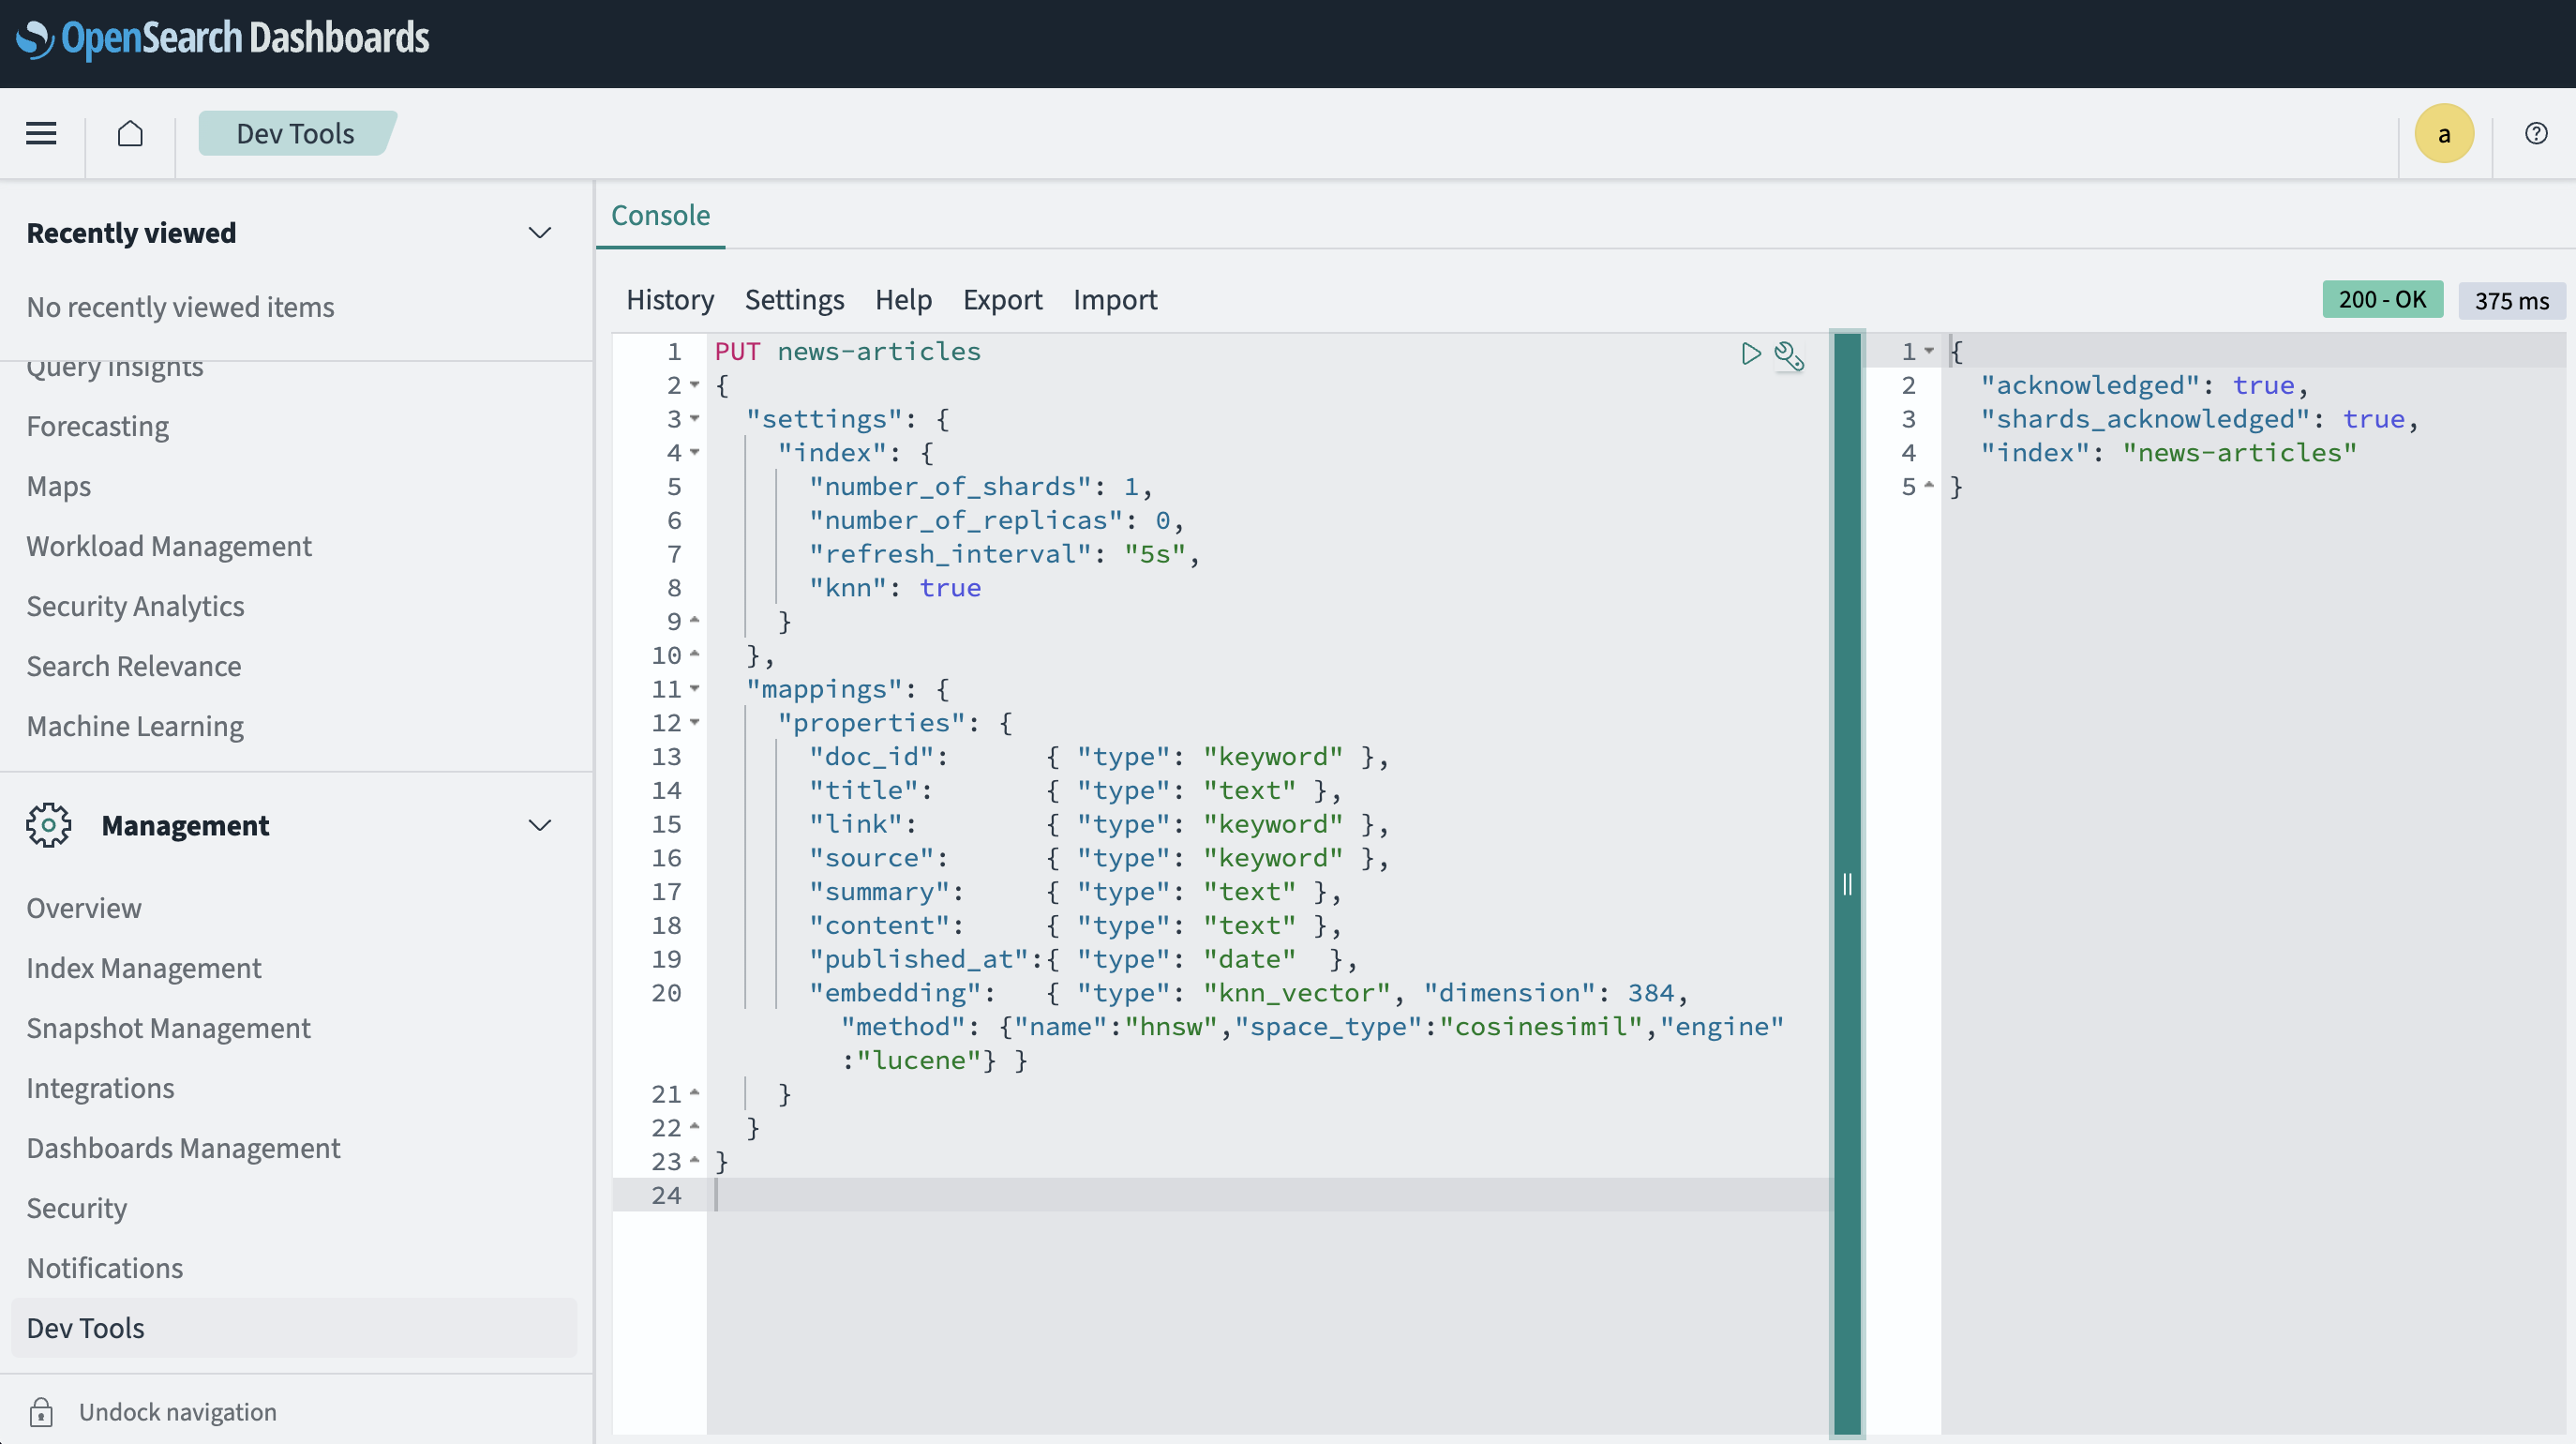
The index can simply be created by using the OpenSearch Dev Console in the web interface:
Open Dev Tools → Console and run:
PUT news-articles
{
  "settings": {
    "index": {
      "number_of_shards": 1,
      "number_of_replicas": 0,
      "refresh_interval": "30s",
      "knn": true
    }
  },
  "mappings": {
    "properties": {
      "doc_id":      { "type": "keyword" },
      "title":       { "type": "text" },
      "link":        { "type": "keyword" },
      "source":      { "type": "keyword" },
      "summary":     { "type": "text" },
      "content":     { "type": "text" },
      "published_at":{ "type": "date"  },
      "embedding":   { "type": "knn_vector", "dimension": 384, "method": {"name":"hnsw","space_type":"cosinesimil","engine":"lucene"} }
    }
  }
}
Alternative: Use curl instead of the web UI
curl -k -u admin:<custom-admin-password> \
  -H "Content-Type: application/json" \
  -X PUT "https://localhost:9200/news-articles" \
  -d @- <<'JSON'
{
  "settings": {
    "index": {
      "number_of_shards": 1,
      "number_of_replicas": 0,
      "refresh_interval": "5s",
      "knn": true
    }
  },
  "mappings": {
    "properties": {
      "doc_id":      { "type": "keyword" },
      "title":       { "type": "text" },
      "link":        { "type": "keyword" },
      "source":      { "type": "keyword" },
      "summary":     { "type": "text" },
      "content":     { "type": "text" },
      "published_at":{ "type": "date"  },
      "embedding":   { "type": "knn_vector", "dimension": 384, "method": {"name":"hnsw","space_type":"cosinesimil","engine":"lucene"} }
    }
  }
}
JSON
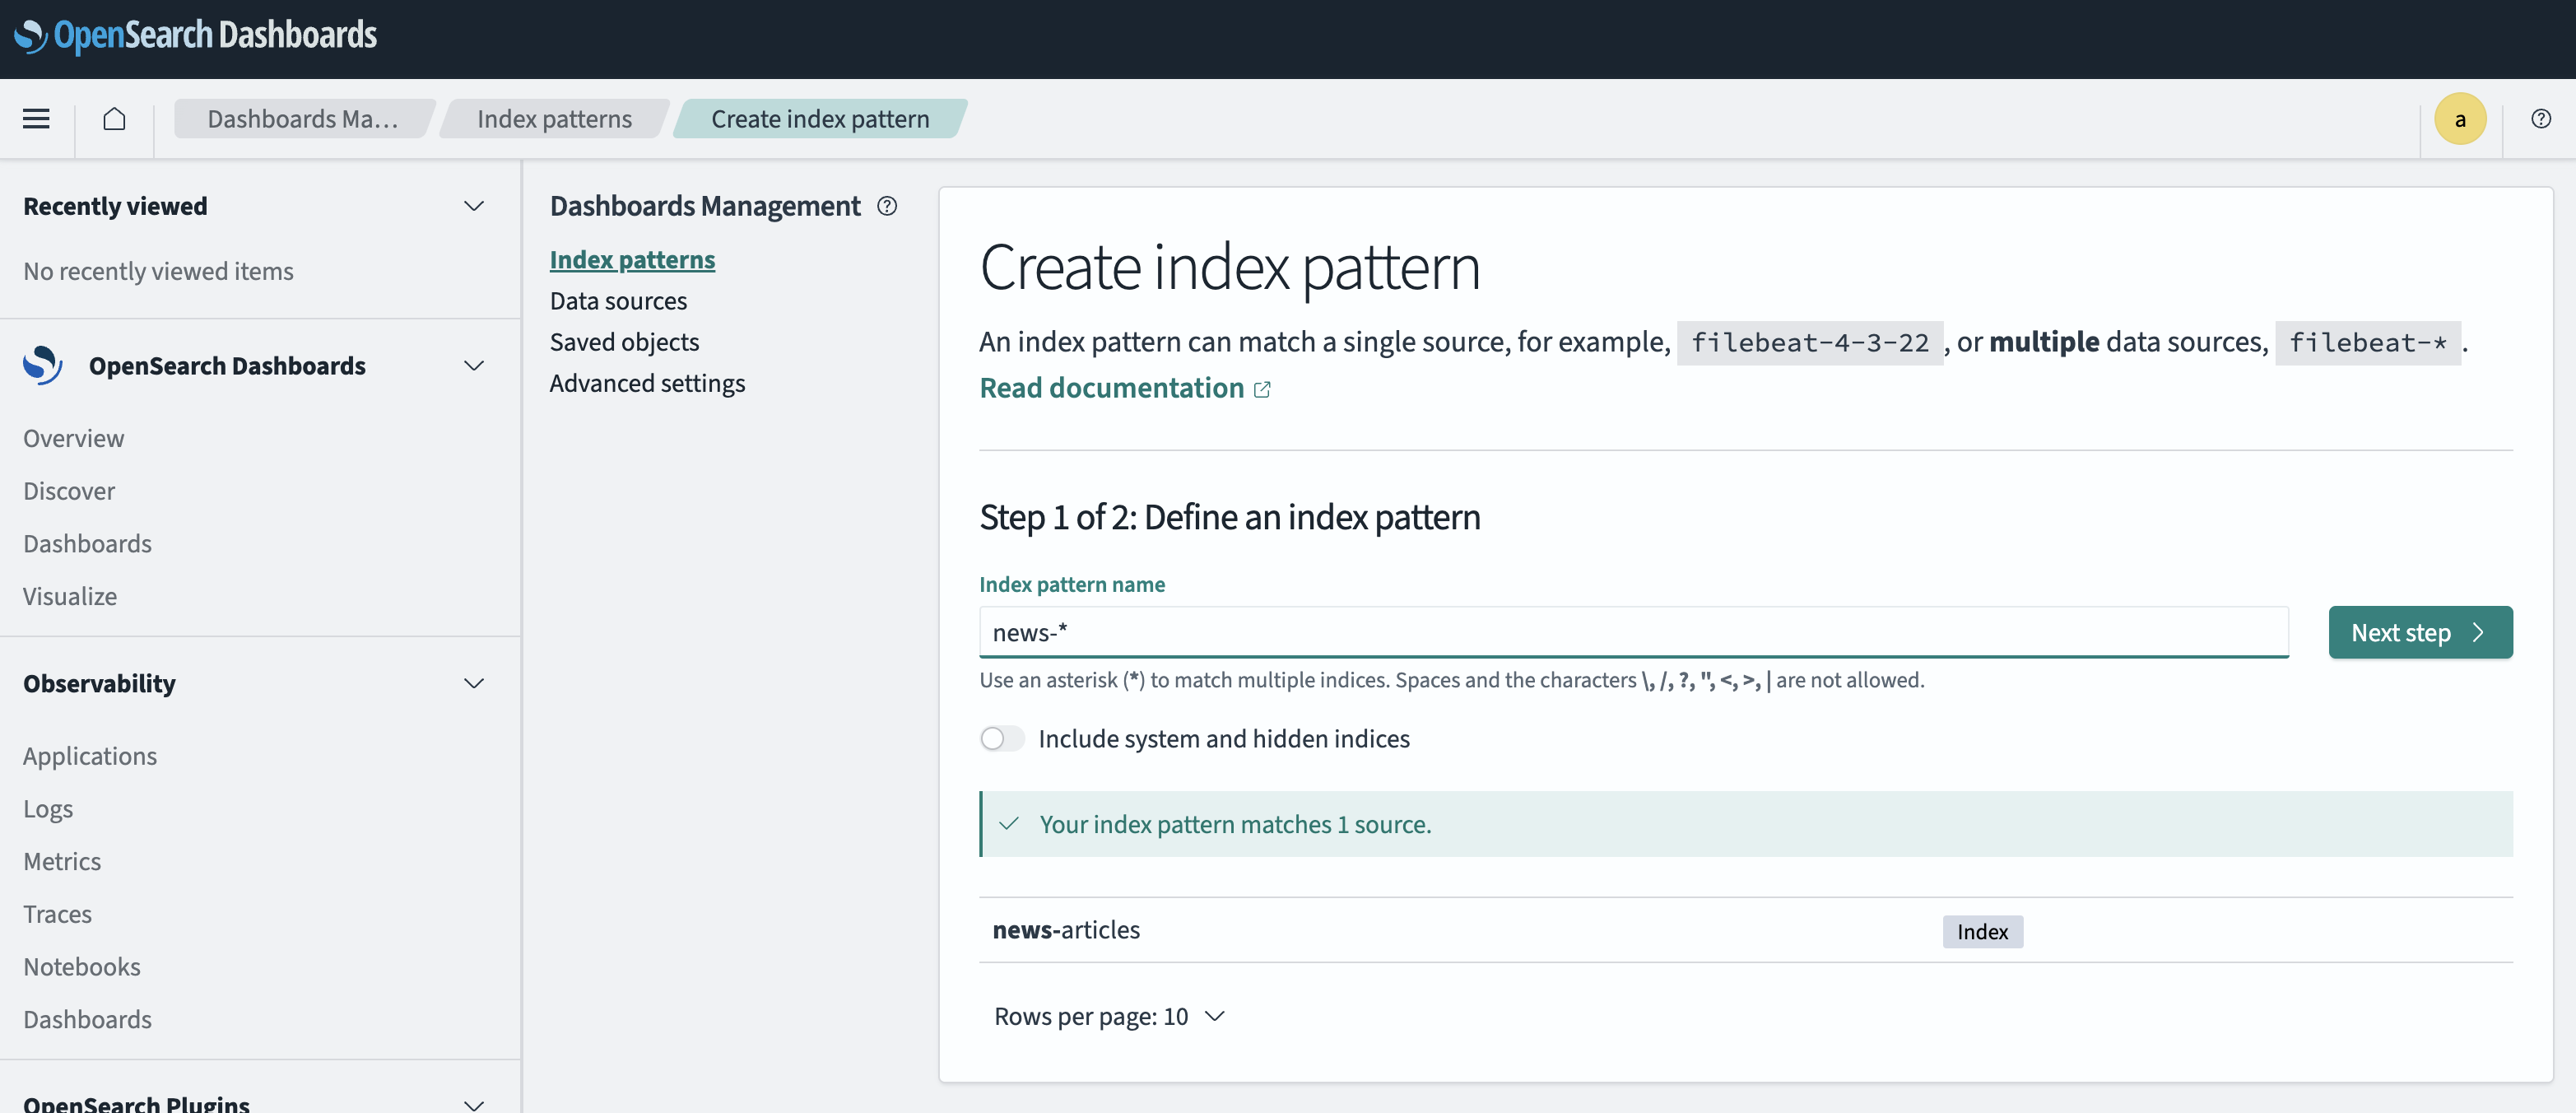
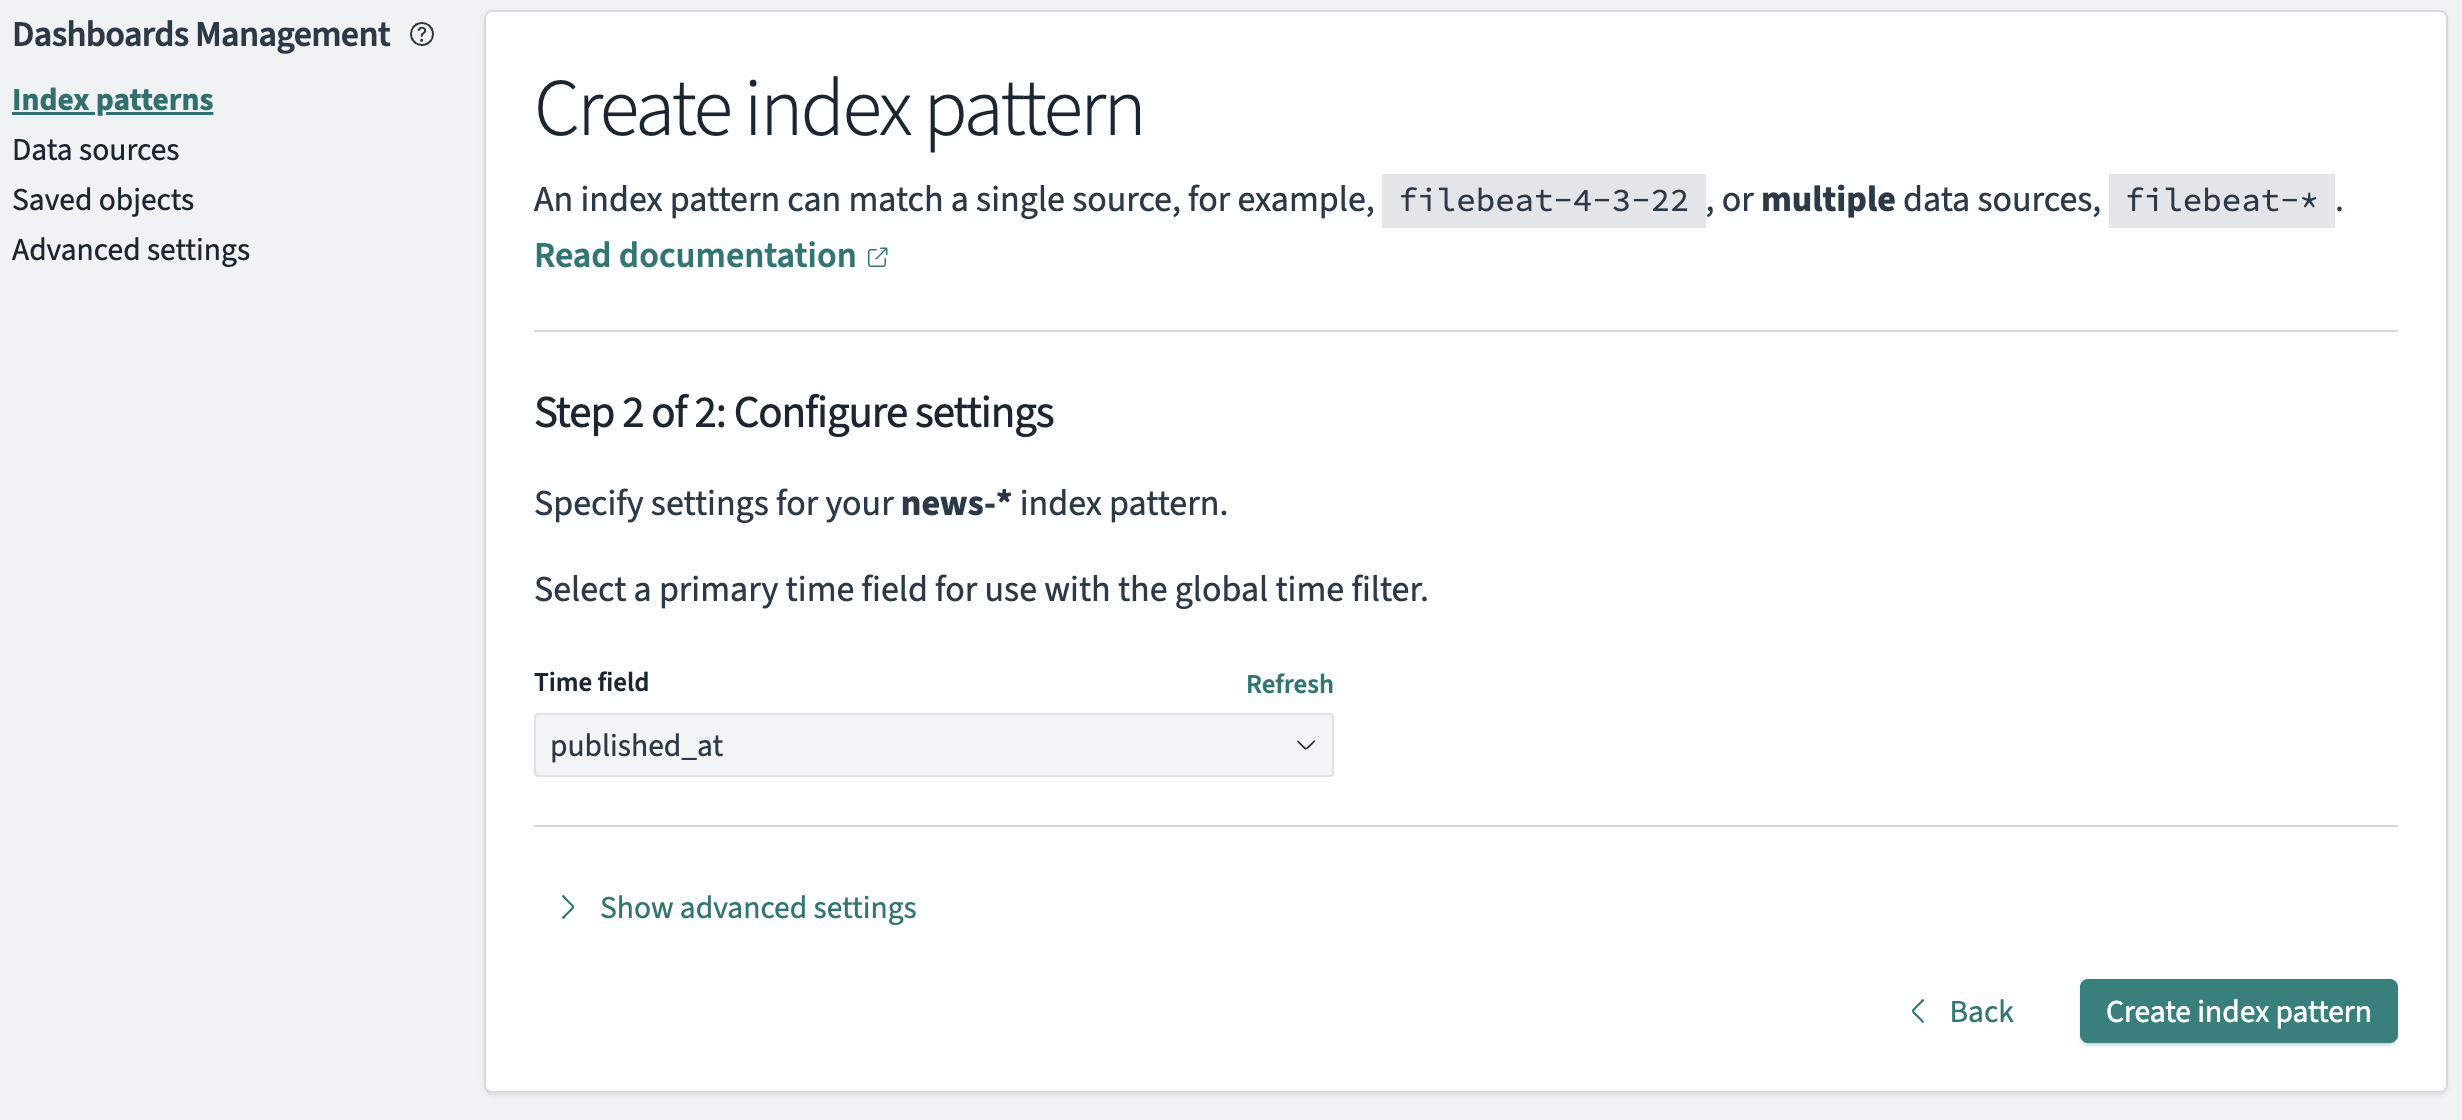
After that you need to create an index pattern to view the content of the index in the OpenSearch Dashboard Discover UI:
Install Apache Airflow
Next, I’ll add Apache Airflow, which will orchestrate and monitor the ingestion pipeline. Airflow will fetch the feeds, process the articles, and insert them into OpenSearch on a schedule.
Prepare
Create a new directory for the Docker files:
sudo mkdir /opt/docker/airflow && cd /opt/docker/airflow
Install
- Set Airflow UIDs Airflow runs as your local UID to avoid permission drama:
echo "AIRFLOW_UID=$(id -u)" | sudo tee .env
echo "AIRFLOW_GID=$(id -g)" | sudo tee -a .env
- Add dependencies to Airflows runtime containers Airflow needs your Python deps in all runtime containers! Installing them only in the webserver won’t help. The worker runs the tasks.
sudo nano /opt/docker/airflow/.env
echo 'PIP_ADDITIONAL_REQUIREMENTS=feedparser opensearch-py "sentence-transformers<=3.0.1"' | sudo tee -a /opt/docker/airflow/.env
# (Optional but helpful) persist HF model cache so it isn’t re-downloaded:
echo 'HF_HOME=/opt/airflow/.cache/huggingface' | sudo tee -a /opt/docker/airflow/.env
Install the dependencies manually:
docker compose exec --user airflow airflow-worker \
  bash -lc "python -m pip install feedparser opensearch-py 'sentence-transformers<=3.0.1'"
- Download the Compose file:
sudo wget https://airflow.apache.org/docs/apache-airflow/3.0.6/docker-compose.yaml
- Initialize Airflow and Flower UI:
docker compose --profile flower up airflow-init
- Start everything in background
docker compose --profile flower up -d
Now the flower web-ui can be opened through http://<docker-host>:5555 and the API can be queried through http://<docker-host>:8080
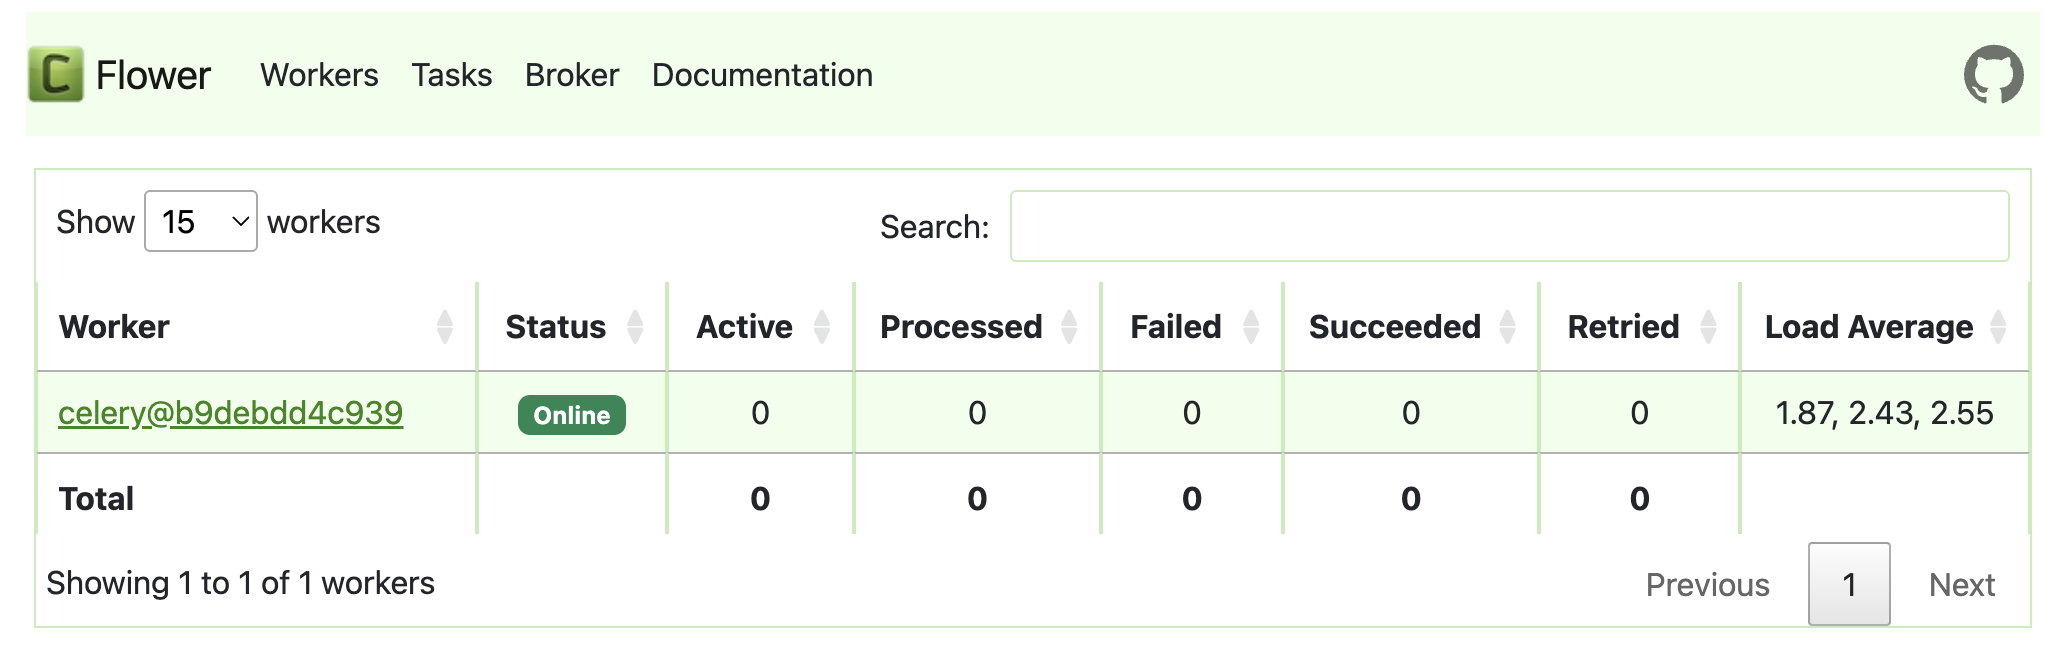
airflow Password: airflow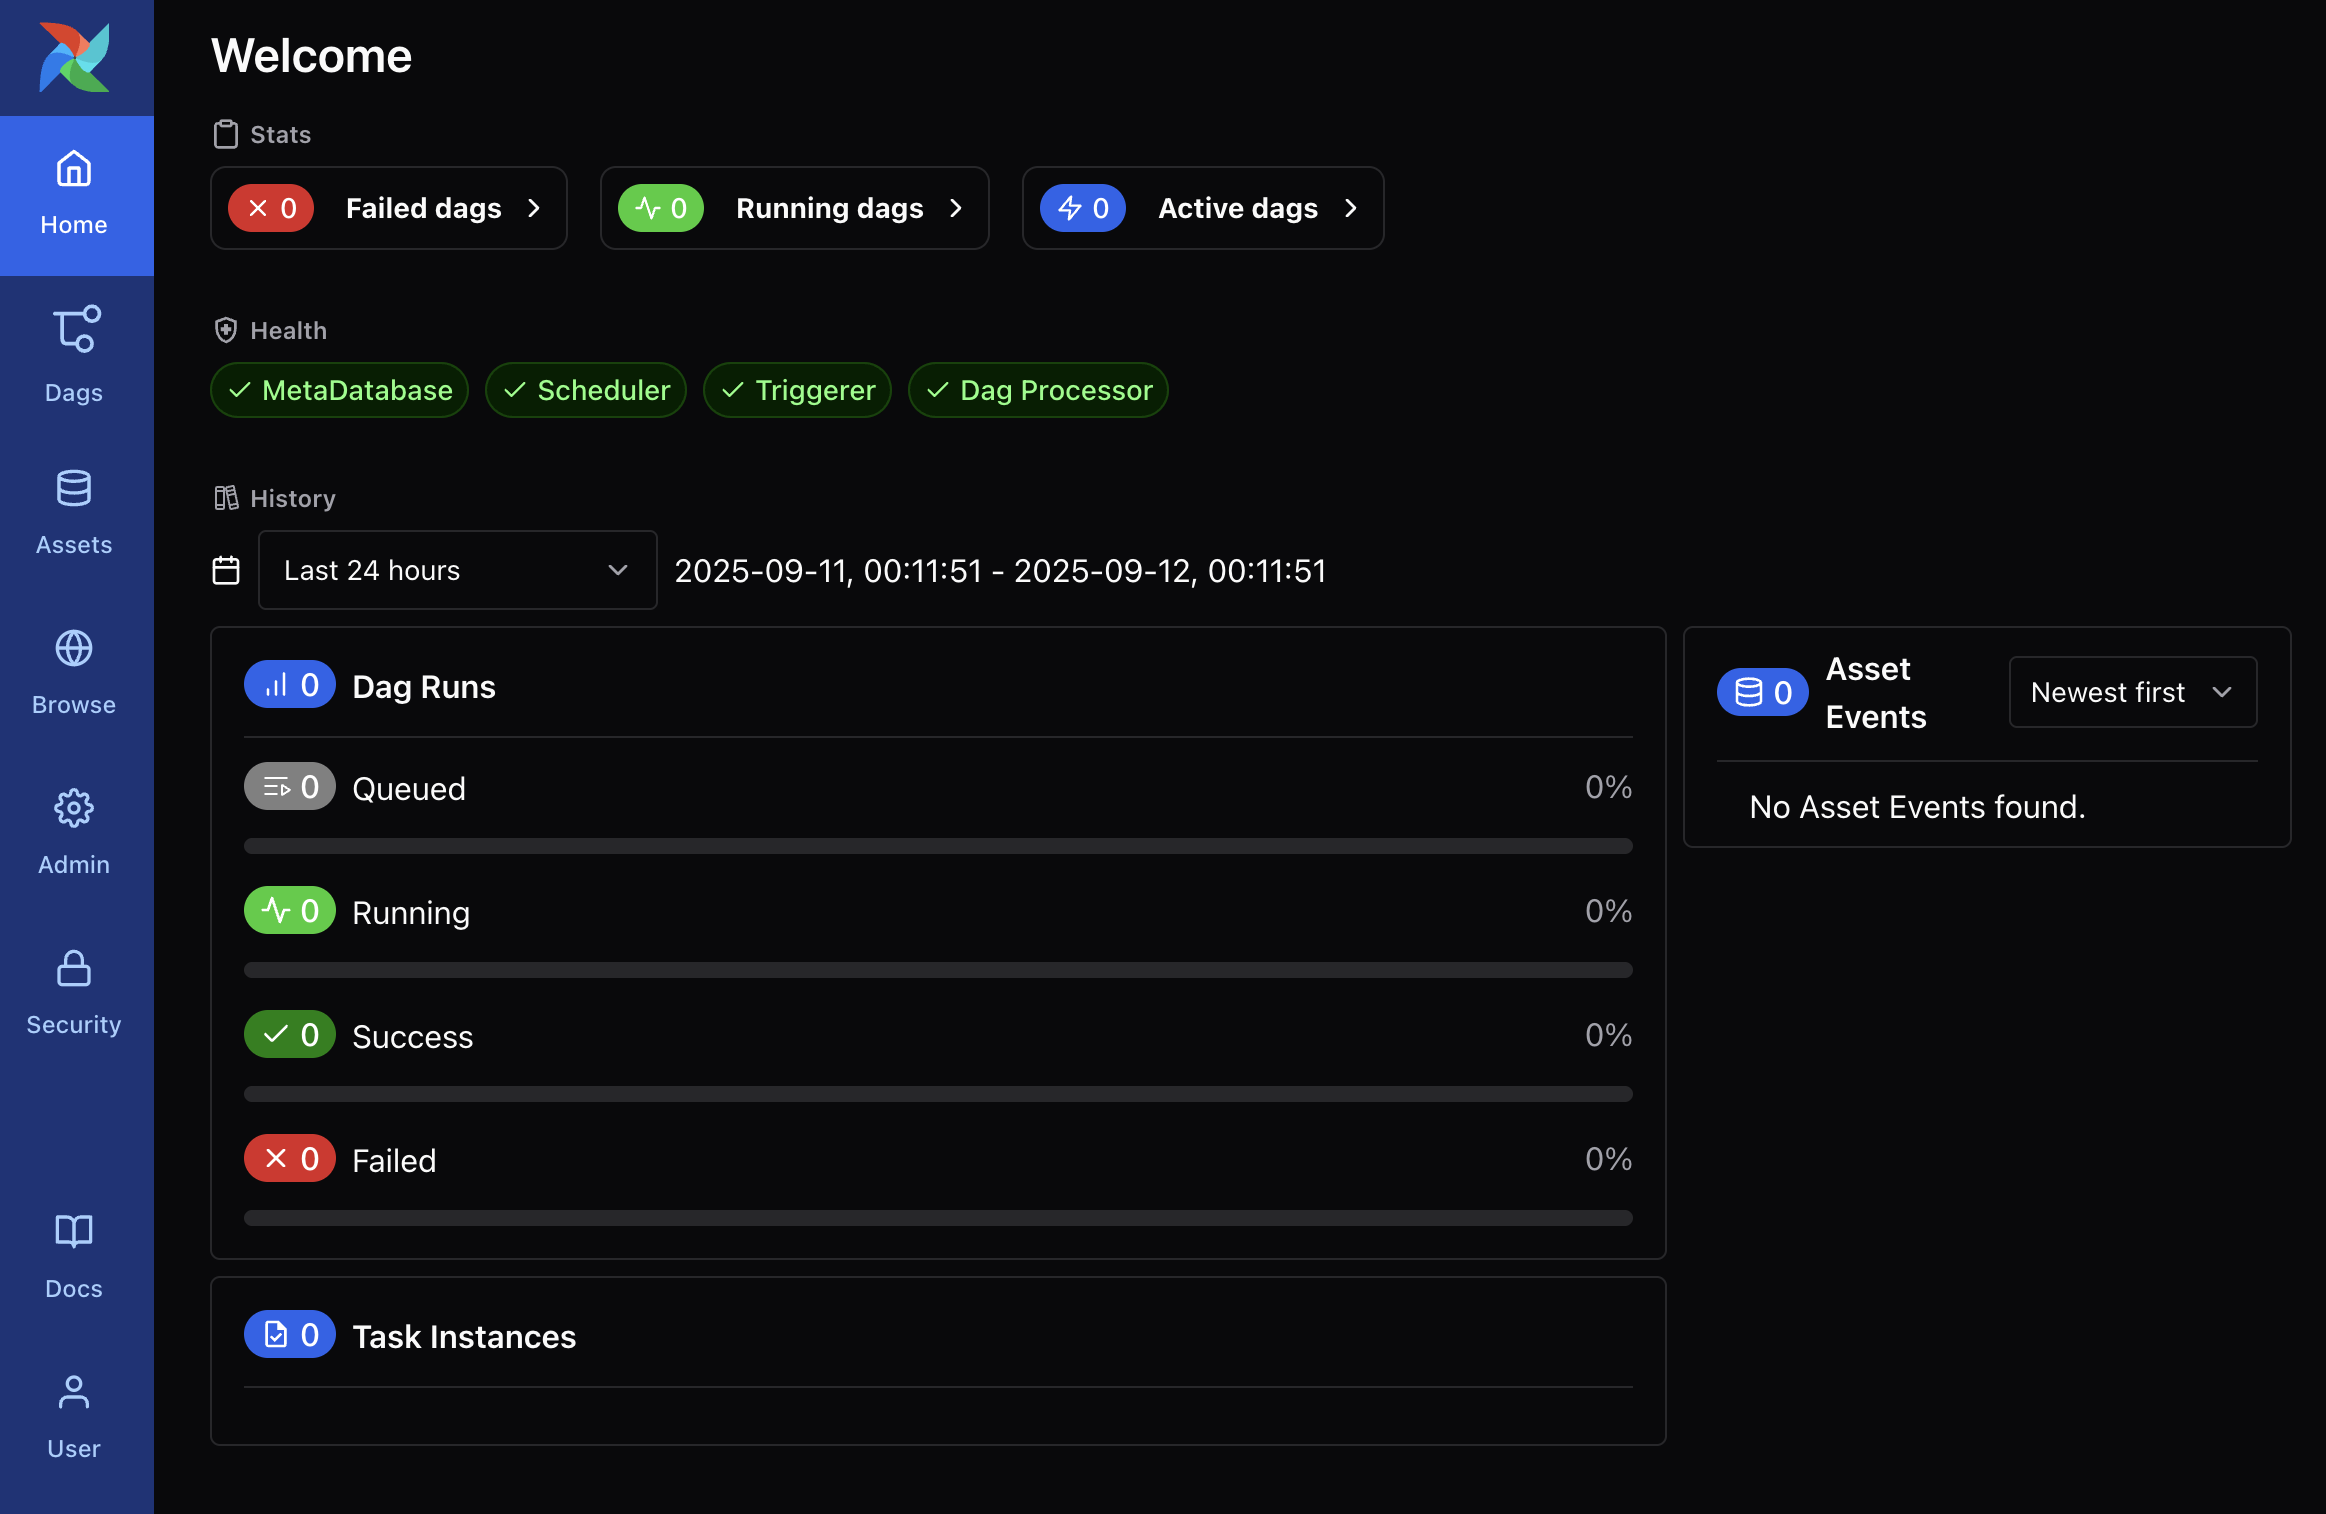
The ingestion DAG
The core of this project is the DAG (Directed Acyclic Graph) that ties everything together.
It runs every 30 minutes and does the following:
- Reads RSS URLs from Airflow Variable RSS_FEEDS
- Parses entries via feedparser
- (Optional) fetches the article body with Readability (off by default to keep deps small)
- Dedupes by hashing the link → doc_id
- Embeds title + summary/content with all-MiniLM-L6-v2 from sentence-transformers
- Upserts into OpenSearch (index: news-articles) with k-NN vector
- Connect flow to OpenSearch:
The code uses BaseHook.get_connection(“opensearch_default”). Without this, it will fail.
docker compose exec airflow-apiserver \
airflow connections add opensearch_default \
  --conn-uri 'https://admin:<custom-admin-password>@<host-or-ip>:9200'
- Provide the Airflow Variable with a list of RSS feeds
My DAG reads Variable.get(“RSS_FEEDS”); it needs to be set before running:
docker compose exec airflow-apiserver \
airflow variables set RSS_FEEDS \
'[
  "https://www.cisa.gov/news-rss.xml",
  "https://feeds.feedburner.com/TheHackersNews",
  "https://www.bleepingcomputer.com/feed/",
  "https://krebsonsecurity.com/feed/",
  "https://www.ncsc.gov.uk/api/1/services/v1/news-rss-feed.xml"
]'
Create DAG file
The DAG file will be stored in: /opt/docker/airflow/dags/rss_to_opensearch.py
Click here to view the code
from __future__ import annotations
import hashlib
import os
from datetime import datetime, timedelta, timezone

from airflow import DAG
from airflow.decorators import task
from airflow.models import Variable
from airflow.hooks.base import BaseHook

import feedparser
from opensearchpy import OpenSearch, RequestsHttpConnection
from sentence_transformers import SentenceTransformer

INDEX_NAME = "news-articles"
EMBED_MODEL_NAME = os.environ.get("EMBED_MODEL_NAME", "sentence-transformers/all-MiniLM-L6-v2")

default_args = {
    "owner": "airflow",
    "retries": 2,
    "retry_delay": timedelta(minutes=5),
}

with DAG(
    dag_id="rss_to_opensearch",
    default_args=default_args,
    schedule=timedelta(minutes=30),
    start_date=datetime(2025, 1, 1, tzinfo=timezone.utc),
    catchup=False,
    tags=["rss", "opensearch", "rag"],
) as dag:

    @task
    def get_feeds() -> list[str]:
        feeds = Variable.get("RSS_FEEDS", default_var="[]")
        import json
        return json.loads(feeds)

    @task
    def fetch_entries(feed_urls: list[str]) -> list[dict]:
        out = []
        for url in feed_urls:
            parsed = feedparser.parse(url)
            for e in parsed.entries:
                out.append({
                    "title": e.get("title", ""),
                    "link": e.get("link", ""),
                    "summary": e.get("summary", "") or e.get("description", ""),
                    "published_at": e.get("published_parsed") and datetime(*e.published_parsed[:6]).isoformat(),
                    "source": parsed.feed.get("title", url),
                })
        return out

    @task
    def enrich_and_embed(entries: list[dict]) -> list[dict]:
        # single global model load per task run
        model = SentenceTransformer(EMBED_MODEL_NAME)
        payloads = []
        for e in entries:
            if not e.get("link"):
                continue
            doc_id = hashlib.sha256(e["link"].encode("utf-8")).hexdigest()
            text = " ".join([e.get("title",""), e.get("summary","")]).strip()
            emb = model.encode(text or e.get("title",""), normalize_embeddings=True).tolist()
            payloads.append({
                "doc_id": doc_id,
                "title": e.get("title",""),
                "link": e["link"],
                "summary": e.get("summary",""),
                "content": "",  # Full-text can be added later
                "source": e.get("source",""),
                "published_at": e.get("published_at"),
                "embedding": emb,
            })
        return payloads

    @task
    def upsert_to_opensearch(docs: list[dict]) -> int:
        conn = BaseHook.get_connection("opensearch_default")

        client = OpenSearch(
            hosts=[{"host": conn.host, "port": conn.port}],
            http_auth=(conn.login, conn.password),
            use_ssl=(conn.schema == "https"),
            verify_certs=False,  # dev only; use a CA in prod
            connection_class=RequestsHttpConnection,
            timeout=30,
            max_retries=2,
            retry_on_timeout=True,
        )

        from opensearchpy.helpers import bulk
        def gen_actions():
            for d in docs:
                yield {
                    "_op_type": "index",
                    "_index": INDEX_NAME,
                    "_id": d["doc_id"],
                    "_source": d,
                }

        success, _ = bulk(client, gen_actions(), request_timeout=60, chunk_size=200)
        return success

    feed_urls = get_feeds()
    entries = fetch_entries(feed_urls)
    docs = enrich_and_embed(entries)
    _ = upsert_to_opensearch(docs)
Save the file, and Airflow will auto-detect the DAG in about one minute. It can also be triggered manually using the AirFlow UI.
Test the pipeline
Manually trigger the DAG in Airflow UI:
Or using the CLI:
docker compose exec airflow-webserver airflow dags trigger rss_to_opensearch
Observe the logs:
Airflow UI → DAGs → rss_to_opensearch → Graph → click a task → Logs
Or using Docker: compose logs -f airflow-worker
Now the ingested news articles should appear in the Discover page in the OpenSearch Dashboards UI: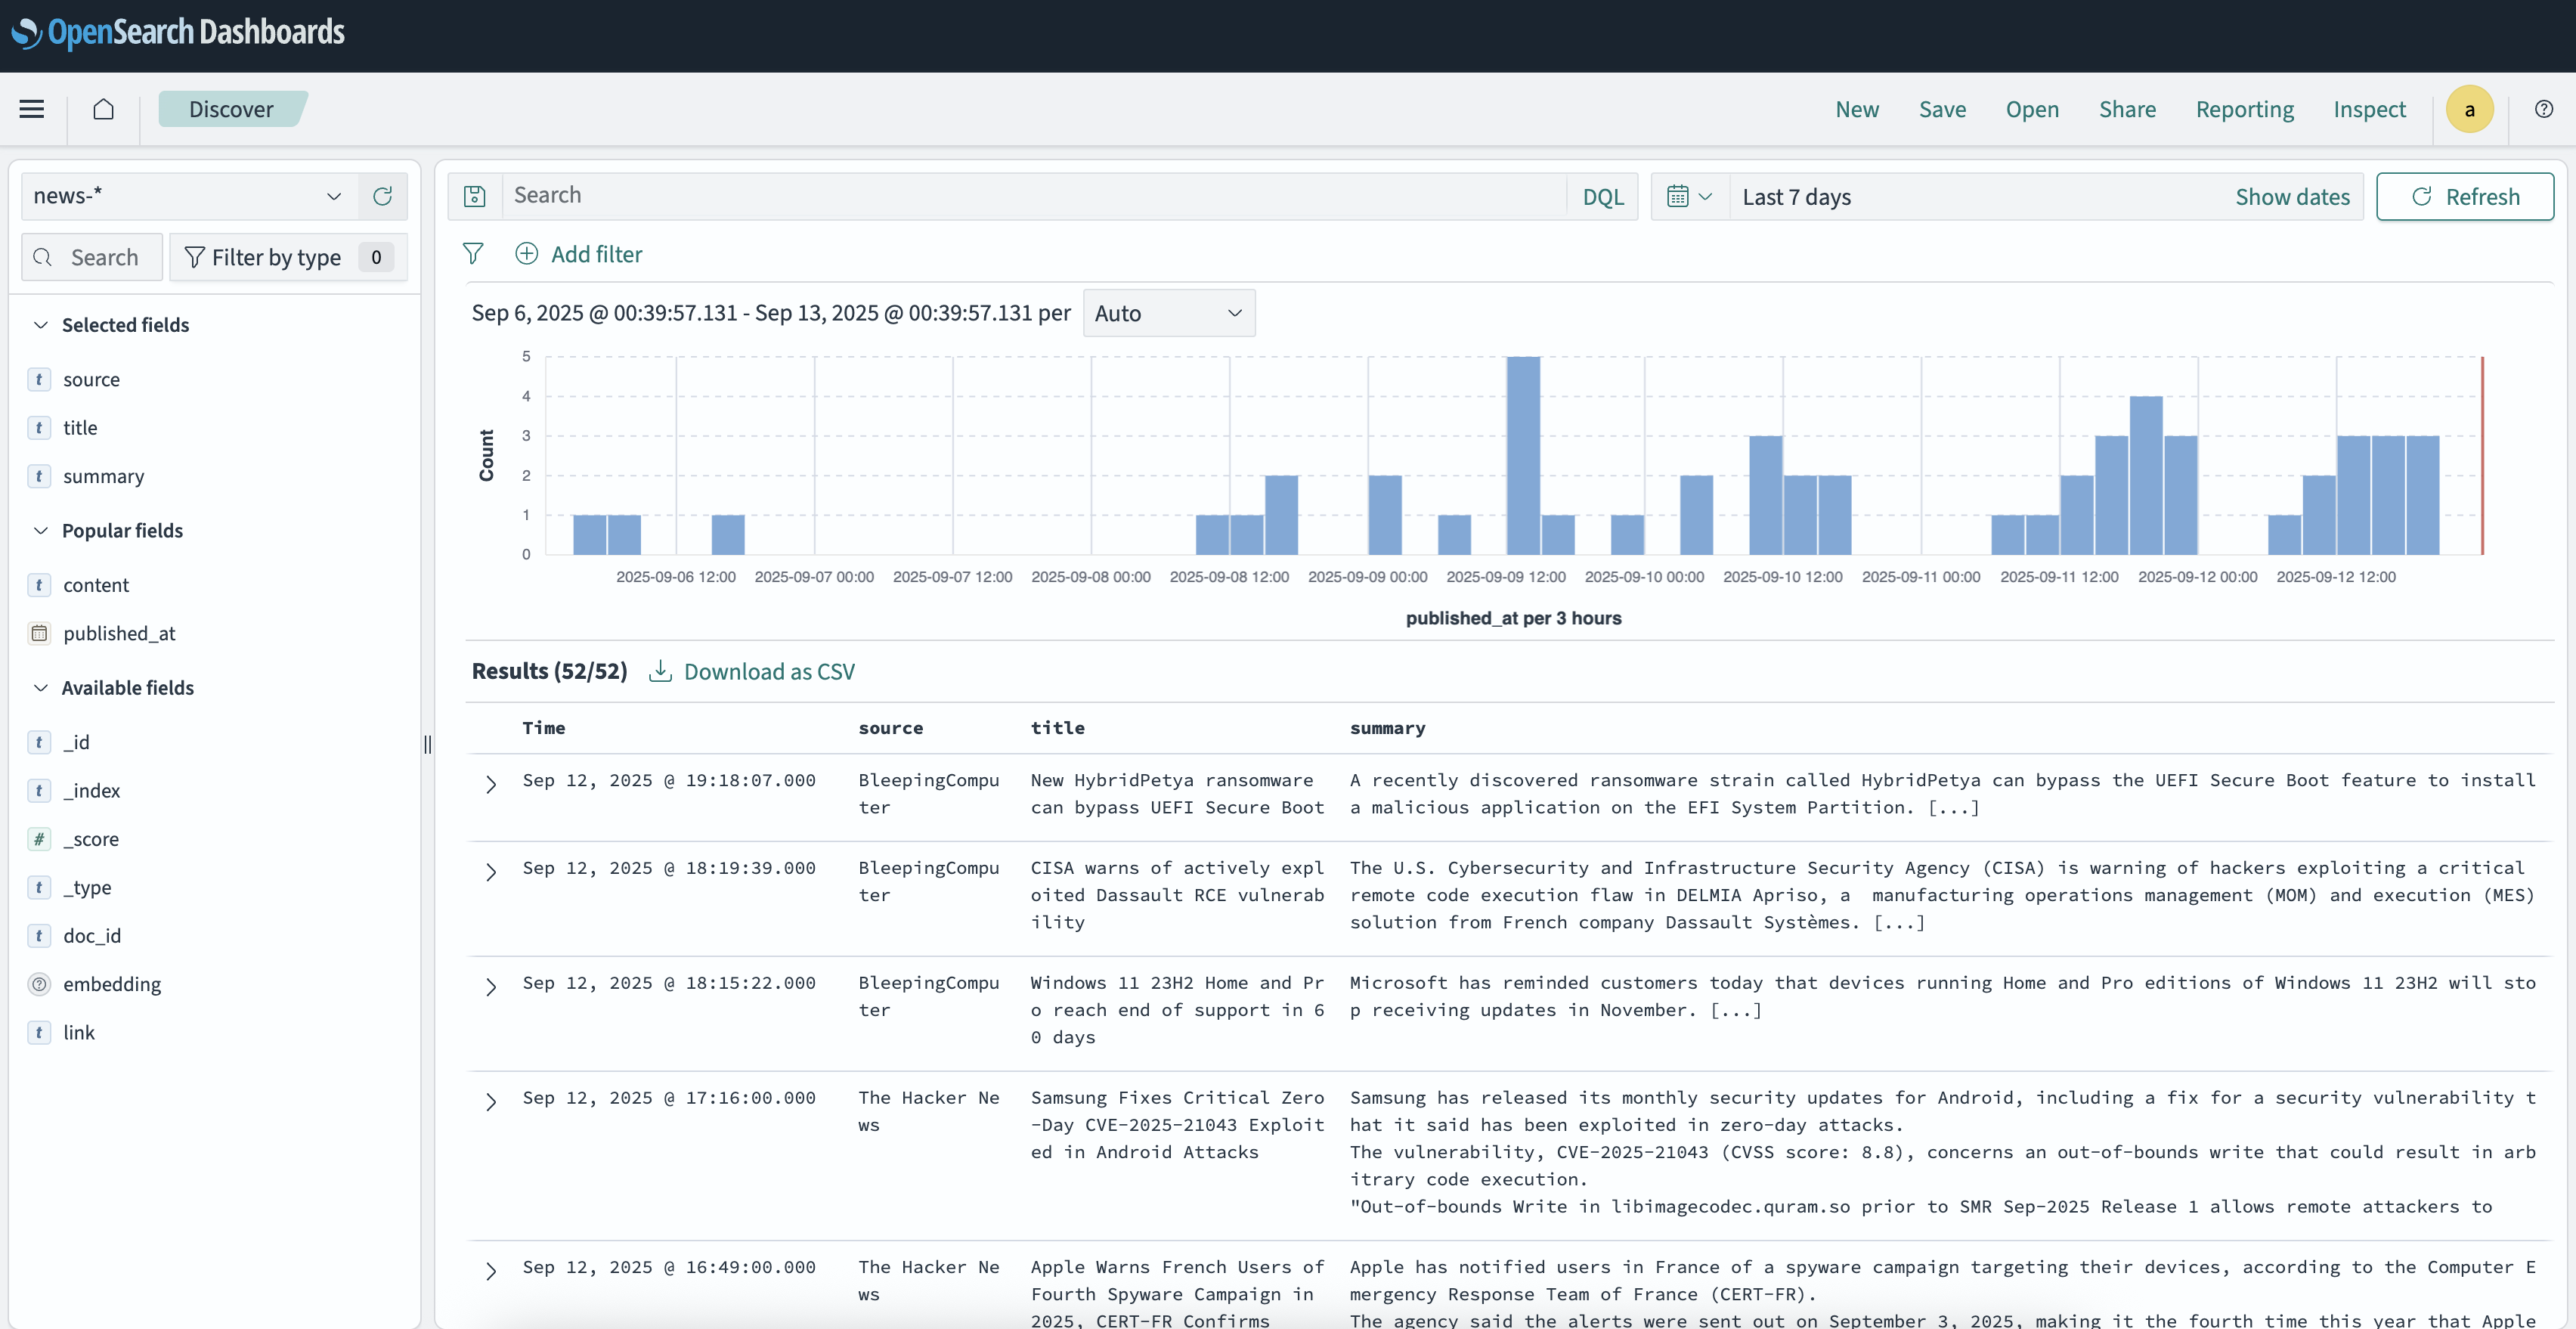
It is also possible to confirm the ingestion by running a command on the cli:
curl -k -u admin:<custom-admin-password> "https://localhost:9200/news-articles/_count"
More data
This prototype will be limited to RSS feeds, as they’re a straightforward way to ingest large volumes of frequently changing data while keeping this post concise.
In addition to RSS, the following data sources could also be added for generating the best possible answers:
- Threat Advisories
- CISA
- CERT-EU
- UK NCSC
- NSA Cybersecurity advisories/guidance
- Red Hat Security Data API (CSAF/CVE/OVAL)
- Cisco PSIRT openVuln API
- Microsoft Security Update Guide (CVRF/APIs)
- Vulerability Data
- NIST NVD
- cve.org
- OSV.dev
- GitHub Advisory Database
- Security knowledge bases
- MITRE ATT&CK & D3FEND
- APEC (attack patterns) and CWE (weaknesses)
- NIST CSF 2.0 Reference Tool
- Other
- Google Project Zero
- ENISA Threat Landscape & sector reports
Query the data using an LLM
Now a custom LLM can be connected to the database. I’ll use OpenAi’s GPT-5, but a self hosted model would also do the trick. As my homeserver does not have enough compute to run a model locally I’ll stick with GPT-5.
Install the OpenSearch Dashboards Assistant Plugin
OpenSearch Dashboards offers an Assistant plugin that allows us to query the data using an LLM directly through the web interface. This makes it comfortable to play with the data without having to code a custom script or UI first.
- Install Assistant by adding the following lines to the
.envfile and then restart the stack.
PLUGINS_ML_COMMONS_AGENT_FRAMEWORK_ENABLED=true
PLUGINS_ML_COMMONS_RAG_PIPELINE_FEATURE_ENABLED=true
ASSISTANT_CHAT_ENABLED=true
OBSERVABILITY_QUERY_ASSIST_ENABLED=true
- Cluster settings (remote LLM + dev ML on data node)
PUT /_cluster/settings
{
  "persistent": {
    "plugins.ml_commons.trusted_connector_endpoints_regex": ["^https://api\\.openai\\.com/.*$"],
    "plugins.ml_commons.allow_registering_model_via_url": true,
    "plugins.ml_commons.only_run_on_ml_node": false
  }
}
- Register a 384-dimensional embedding model (for VectorDBTool)
POST /_plugins/_ml/models/_register?deploy=true
{
  "name": "all-MiniLM-L6-v2",
  "version": "1.0.0",
  "description": "Sentence-Transformers all-MiniLM-L6-v2 (384-dim)",
  "model_format": "TORCH_SCRIPT",
  "function_name": "TEXT_EMBEDDING",
  "model_content_hash_value": "c15f0d2e62d872be5b5bc6c84d2e0f4921541e29fefbef51d59cc10a8ae30e0f",
  "model_config": {
    "model_type": "bert",
    "embedding_dimension": 384,
    "framework_type": "sentence_transformers",
    "all_config": "{\"hidden_size\":384,\"num_hidden_layers\":6,\"num_attention_heads\":12,\"vocab_size\":30522}"
  },
  "url": "https://artifacts.opensearch.org/models/ml-models/huggingface/sentence-transformers/all-MiniLM-L6-v2/1.0.1/torch_script/sentence-transformers_all-MiniLM-L6-v2-1.0.1-torch_script.zip"
}
Get its id (you’ll need it as YOUR_EMBEDDING_MODEL_ID):
POST /_plugins/_ml/models/_search
{ "query": { "term": { "name.keyword": "all-MiniLM-L6-v2" } } }
- Create an OpenAI Chat Completions connector (works with Assistant)
POST /_plugins/_ml/connectors/_create
{
  "name": "OpenAI Chat Completions",
  "description": "Chat model for Assistant",
  "version": 1,
  "protocol": "http",
  "parameters": {
    "endpoint": "api.openai.com",
    "model": "gpt-5",
    "response_filter": "$.choices[0].message.content"
  },
  "credential": { "openAI_key": "<OPENAI_API_KEY>" },
  "actions": [
    {
      "action_type": "predict",
      "method": "POST",
      "url": "https://${parameters.endpoint}/v1/chat/completions",
      "headers": {
        "Authorization": "Bearer ${credential.openAI_key}",
        "Content-Type": "application/json"
      },
      "request_body": "{ \"model\": \"${parameters.model}\", \"messages\": [{\"role\":\"user\",\"content\":\"${parameters.prompt}\"}] }"
    }
  ]
}
- Register and test the chat model
POST /_plugins/_ml/models/_register?deploy=true
{
  "name": "OpenAI Chat (for Assistant)",
  "function_name": "remote",
  "description": "Chat model for os_chat",
  "connector_id": "<CONNECTOR_ID>"
}
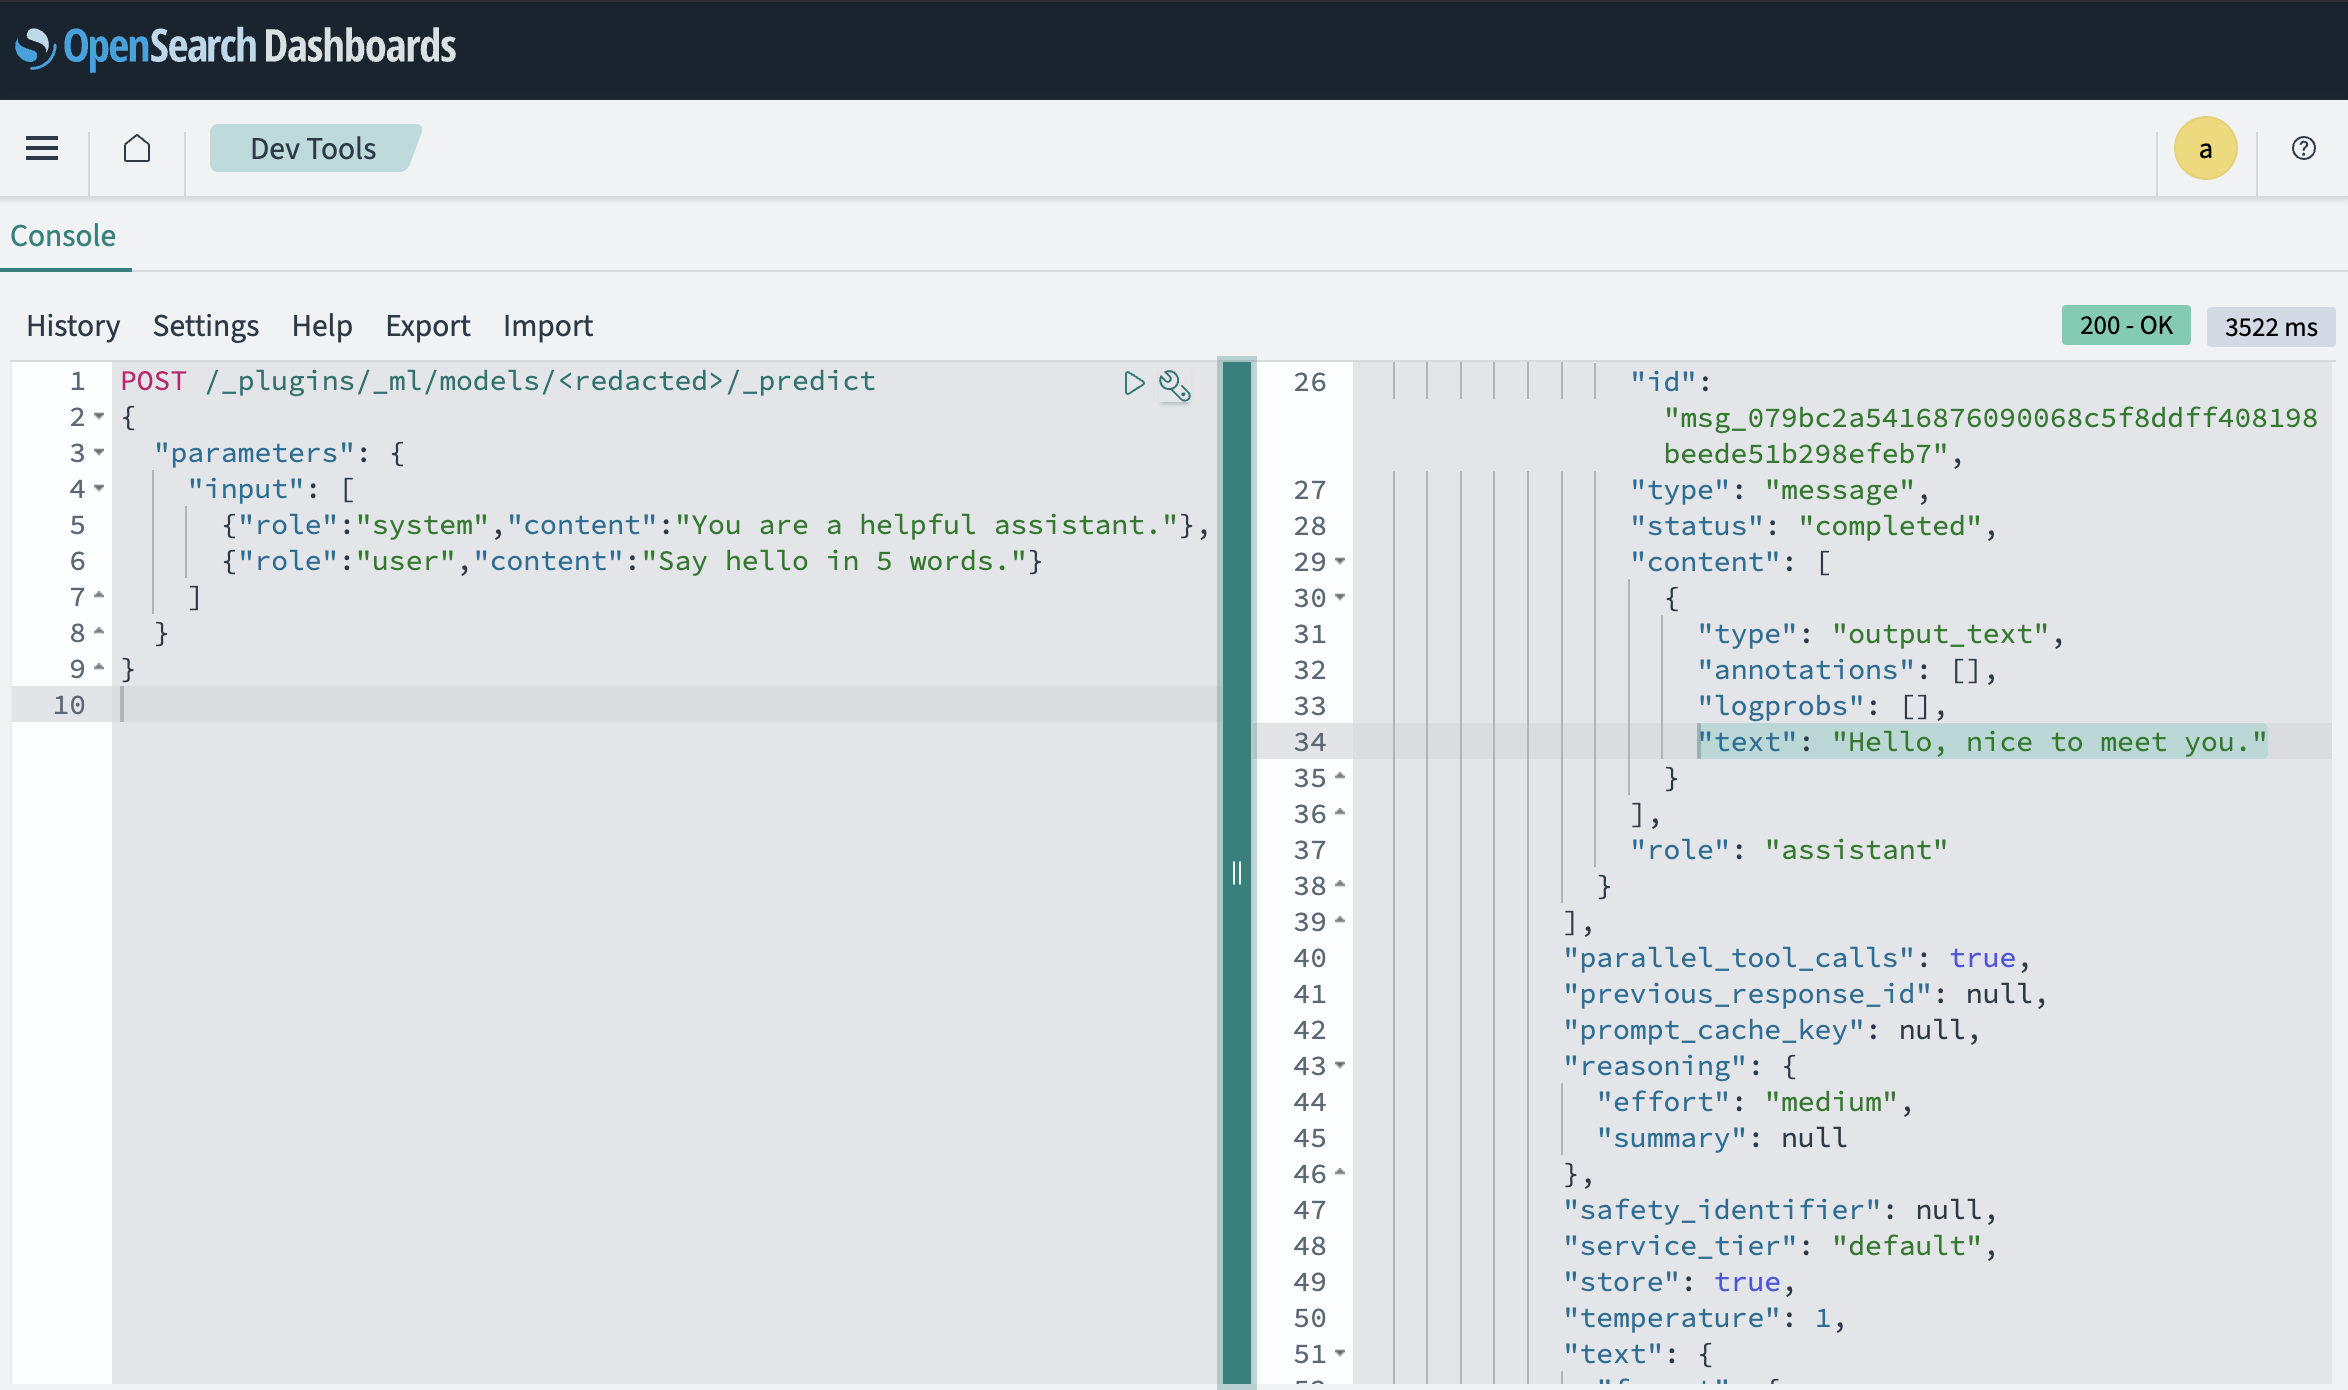
After registering the model you can test it:
POST /_plugins/_ml/models/<LLM_MODEL_ID>/_predict
{ "parameters": { "prompt": "Say hello in 5 words." } }
- Create the conversational agent (RAG over news-articles)
POST /_plugins/_ml/agents/_register
{
  "name": "Cyber News RAG (Conversational)",
  "type": "conversational",
  "description": "Chat over the news-articles index.",
  "app_type": "os_chat",
  "llm": {
    "model_id": "<LLM_MODEL_ID>",
    "parameters": {
      "max_iteration": 5,
      "response_filter": "$.choices[0].message.content",
      "message_history_limit": 5,
      "disable_trace": false
    }
  },
  "memory": { "type": "conversation_index" },
  "tools": [
    {
      "type": "VectorDBTool",
      "name": "cyber_news_kb",
      "description": "RAG over cybersecurity RSS articles.",
      "parameters": {
        "input": "${parameters.question}",
        "index": "news-articles",
        "source_field": ["title","summary","link","source","published_at"],
        "model_id": "<EMBEDDING_MODEL_ID>",
        "embedding_field": "embedding",
        "doc_size": 5
      },
      "include_output_in_agent_response": true
    }
  ]
}
Save the returned agent_id as CONVERSATIONAL_AGENT_ID.
- Create the root agent for Dashboards
POST /_plugins/_ml/agents/_register
{
  "name": "Cyber News Chatbot (Root)",
  "type": "flow",
  "description": "Root agent for OpenSearch Assistant in Dashboards",
  "tools": [
    {
      "type": "AgentTool",
      "name": "LLMResponseGenerator",
      "parameters": { "agent_id": "<CONVERSATIONAL_AGENT_ID>" },
      "include_output_in_agent_response": true
    }
  ],
  "memory": { "type": "conversation_index" }
}
Save ROOT_AGENT_ID.
- Point the UI to the root agent (super-admin call to system index)
From host using the admin client certs:
curl -k --cert ./kirk.pem --key ./kirk-key.pem \
  -H 'Content-Type: application/json' \
  -X PUT https://<host-or-ip>:9200/.plugins-ml-config/_doc/os_chat -d '{
    "type":"os_chat_root_agent",
    "configuration":{ "agent_id":"YOUR_ROOT_AGENT_ID" }
  }'
- Restart Dashboards and chat
docker compose restart opensearch-dashboards
Run a Query
Open Dashboards → chat icon → ask:
Why is the FBI warning about UNC6395?
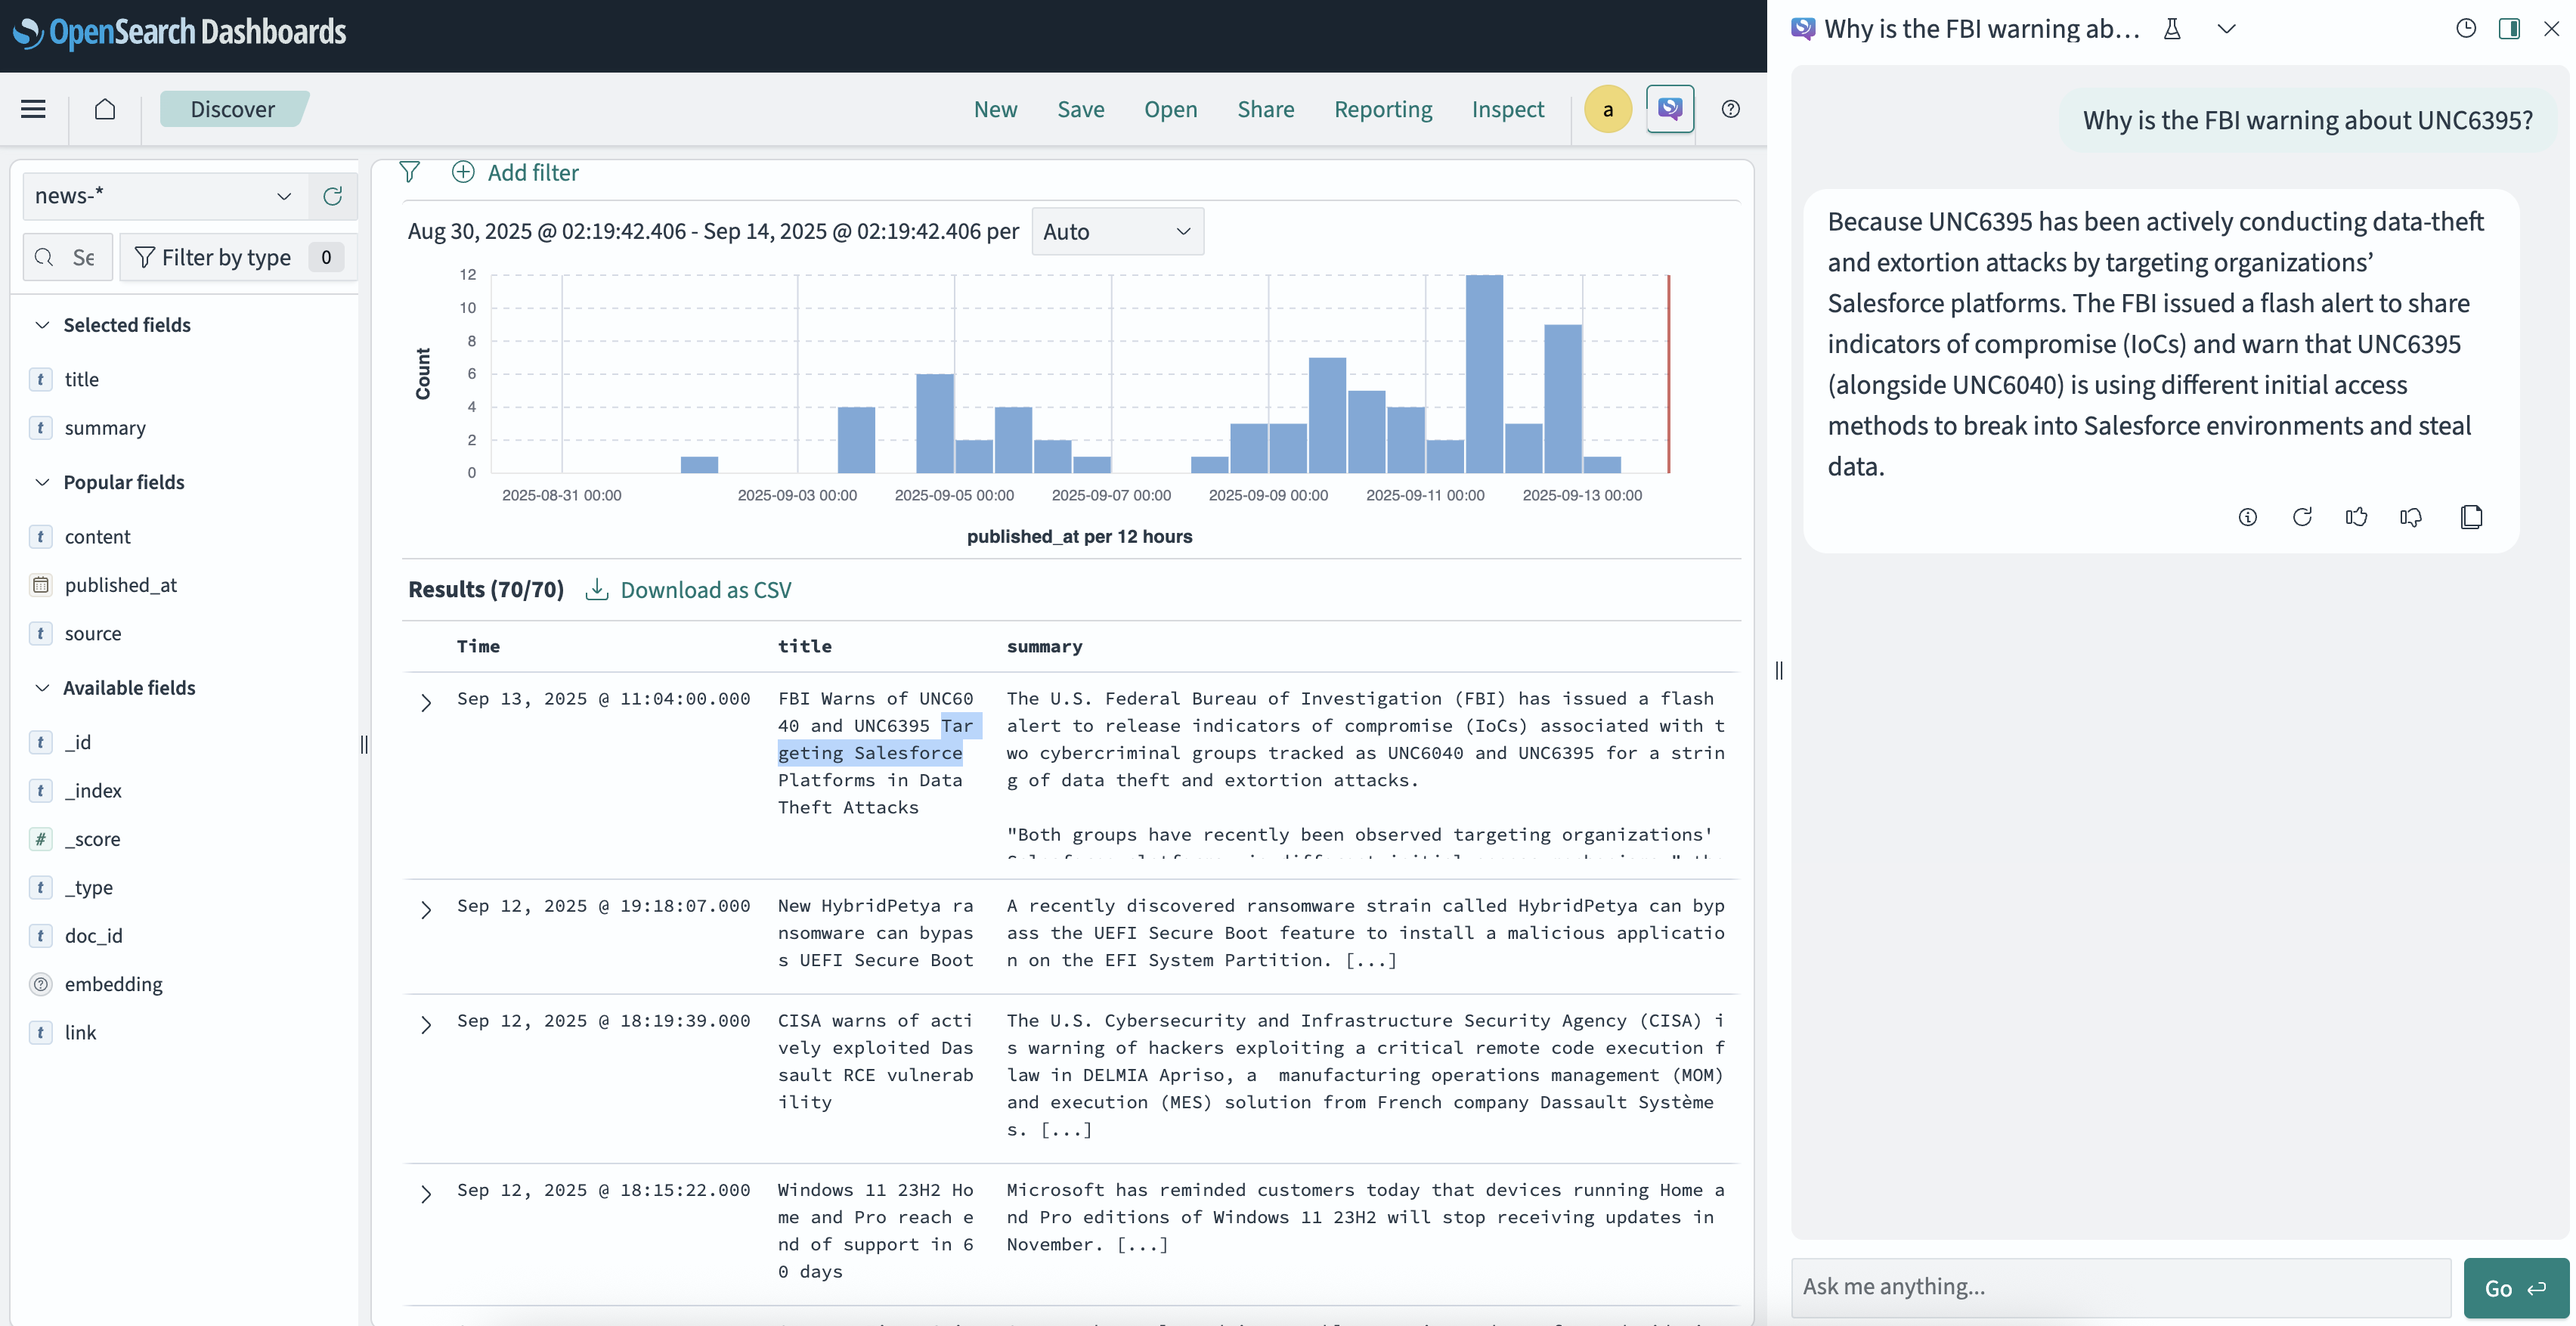
We now have an automated cyber threat intelligence pipeline: feeds flow into OpenSearch, Airflow manages ingestion, and an LLM enables natural language queries. Next steps could include integrating vulnerability databases, building a custom dashboard, or experimenting with different embedding models.